May 26, 2014
Using DICOM Anonymizer To Anonymize A Case For A Teaching File
Simplifying the process of anonymizing a case and labelling it with a diagnosis, keywords, and other attributes is now possible with the use of a freely available application: DICOM Anonymizer. The creator of that application, Wouter Veldhuis, has graciously made a customized version of the application available. This guidance document will describe how to use it. It is very easy and quick!
Obtaining and installing the application
Download a customized version of the application here.
Unzip the file, and place the application in your Applications folder. Open it by right-clicking on it and choosing Open. If, when trying to open it for the first time, you get a warning message about installing an application from an unknown developer, do not be concerned. Go to System Preferences: Security & Privacy. Under the General Tab, choose to allow the application to be opened. You will have to do this once only.
When you open the application, it looks like this:
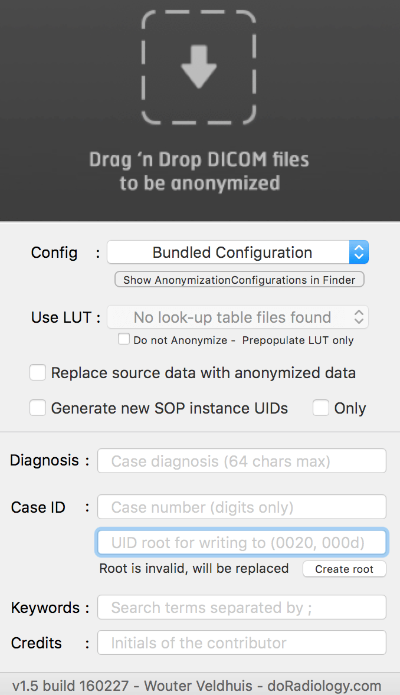
In the image above, the UID root refers to a particular number you will need to insert in a particular DICOM Tag (field)— StudyInstanceUID—in order to keep all the Studie/Series of a particular Teaching Case properly merged. The app will insert it in the Tag for you.
It is best to adhere to the DICOM standard for this field which requires a unique number to avoid collision with any other clinical PACS system (or other DICOM database) in the world.
A personal UID root (prefix) for a Teaching File
The StudyInstanceUID for a particular case will be of the form: UID root.Case number , appending the Case Number to the UID root.
There are two ways to get your own UID root (prefix) for your teaching file:
First method: Request one at the Medical Connections website. Fill in the form and an UID prefix will be e-mailed to you within a few hours. Add .1. at the end of the number. At this point the app will recognize it as a valid UID root. If you create a second OsiriX database for any reason, append .2. to the end of the UID root for it, and so on. (For example, a Teaching File may consist of multiple Databases:Thoracic, Musculoskeletal, Neuroradiology, Abdominal Imaging, etc. In this case, each has its own UID root. This is very convenient for management purposes.)
So, for a Case Number 02303 (as an example), and a root UID of 1.2.826.0.1.3680043.9.5830.1., the complete StudyInstanceUID for the Case will be: 1.2.826.0.1.3680043.9.5830.1.2303
The app will append the Case Number to the end of the root UID for you, after the last period you put there, stripping any leading zeros from it, which is necessary according to the DICOM standard. It will then write it to the proper Tag in the DICOM header for the case.
Second method: Get one using the app itself. Click Create root and a personal UID will be generated for you using an approved statistical method. Copy this number, keep it in a safe place, and use it going forward. The number will be of the form 2.25.XXXXXXXXXXXXXX. Put a period at the end of the number, followed by 1., as above. The app will remember it for you. In case it doesn’t, copy-and-paste your personal prefix there.
Important: Once you have your personal UID root (using either method), use it for all your cases in that Database or Teaching File going forward. Do not generate a new UID root for each case. Generate another one only for a separate Database or Teaching File. If you use OsiriX's anonymizer to anonymize a case, manually insert the complete StudyInstanceUID (no leading zeros after periods in the number) for that particular case in the relevant box in the Anonymization Window.
The process for anonymizing and labelling the case
This involves several simple steps:
- Place the folder containing your non-anonymized case on the desktop
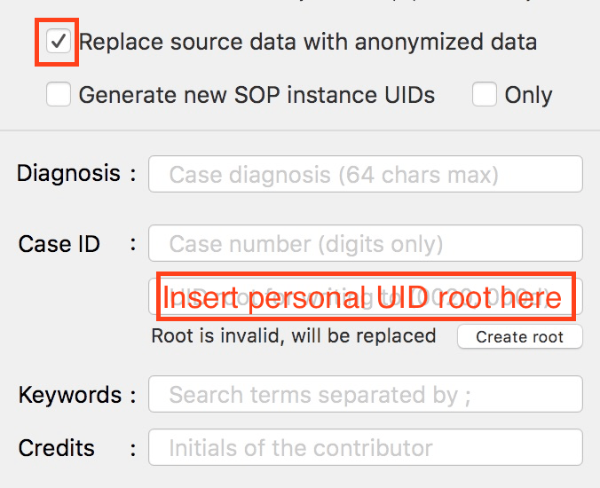
- In the Application Window, fill in the boxes for: Diagnosis (not more than 64 characters); Case Number; Keywords to facilitate searching for the case; and your initials as Contributor of the case. Insert a proper root UID (with a
periodat the end) if it’s not already there. Check the box:Replace source data with anonymized data - Drag-and-drop the folder on the Application Window and confirm that you wish to overwrite the source data in the Dicom Header. Let the application complete the process, which takes very little time.
- Drag-and-drop the folder on the OsiriX Local Database window and import the files.
- Open the meta-data for the case, scroll down the window all the way to the bottom, and confirm that all Private Information has successfully been removed. If any remains, use the edit function in the meta-data window to manually remove it. This should infrequently be necessary.
If you find that the application does not remove Private Information in a particular Dicom field(s) and this happens frequently, you can deal with this by editing a particular file, as follows:
Go to the application in your Applications Folder, and right-click on it. Choose Show Package Contents. Navigate to the Resources Folder and use TextEdit to open the file therein called AnonymizationConfiguration.txt
The entries look like this:
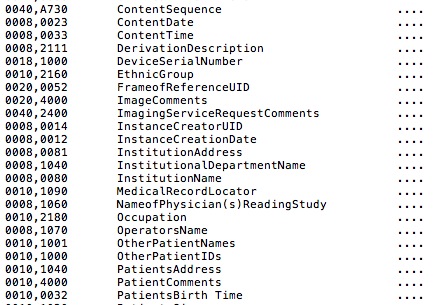
Using the same format for the anonymized tags, add the tag(s) concerned to it. Let me know if this happens frequently so that I can also add an edited file to the application I distribute to colleagues.
Thanks!