Jan 08, 2017
Establishing An Academic Department Teaching Case Server
In an academic radiology department with many subspeciality sections, individual sections may wish to establish a Teaching Case server. Alternatively, the department may wish to establish a single server in which each collaborating section has its own teaching case database, and a user may query and download cases from it.
In this document, I’ll describe various options for establishing such servers with OsiriX and provide guidance for the operations of the servers and associated databases.
Architecture of a departmental server network
A variety of hardware and operational considerations pertain to the choice of an architecture. The hardware considerations pertain to the availability of devices (Mac mini, typically) and the affordability of purchasing a new device(s) for this purpose. The primary operational consideration, in my view, is the availability of (at least one) a person who will be responsible for maintaining the databases—particularly in the case of a central server.
I store each case in the form of JPEG 2000 - compressed files and the average size is about 70 MB. Most cases (Thoracic, in my case) consist of multiple CT and MRI Studies and component Series, totaling hundreds-to-thousands of images. This web page provides an overview of Mac minis, and information about available drives. If you can afford it, use a SSD drive. Because a Server will not be used to view and manipulate cases, as such, extra RAM is not necessary. So, depending on how many other items are on the drive, divide its capacity (in MB) by seventy to get an approximation of the number of cases it can hold.
The database adminstrator(s) need not be familiar with technical issues typically in the remit of a departmental I.T. member. He should be very familiar with the contents of this document— and some others on this web site. I’ll refer to some of them in the discussion below.
Here are three architectures for consideration, and relevant implications of each.
Each section maintains its own server

In this scenario, each participating section has its own server on the Local Area Network . Each server has its own static I.P. address and Web Portal. Each Web Portal may present its cases (using Smart Albums) in a relevant manner, as shown in this screenshot from my Chest Imaging Portal home page:
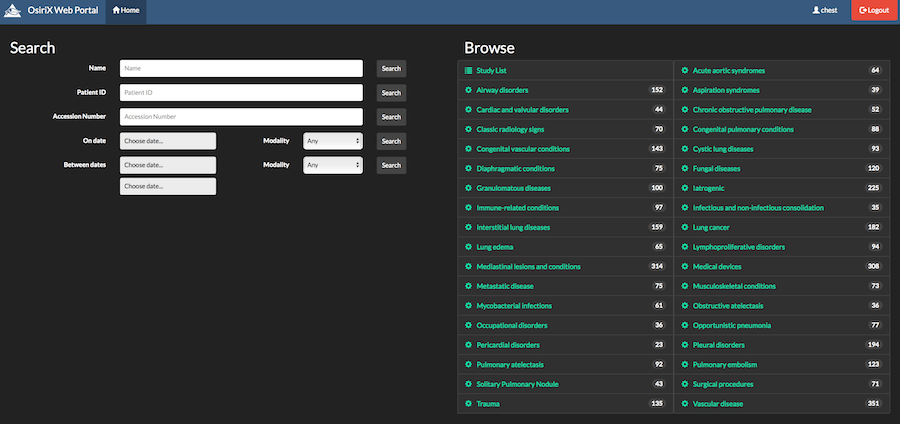
Opinions about the utility of this presentation will vary. It’s the case that most users will search a Portal for particular cases by diagnosis, rather than browse a category. But this is sometimes useful when one wants to efficiently browse the available cases in a particular diagnostic category when, for example, one is preparing a talk on a particular topic.
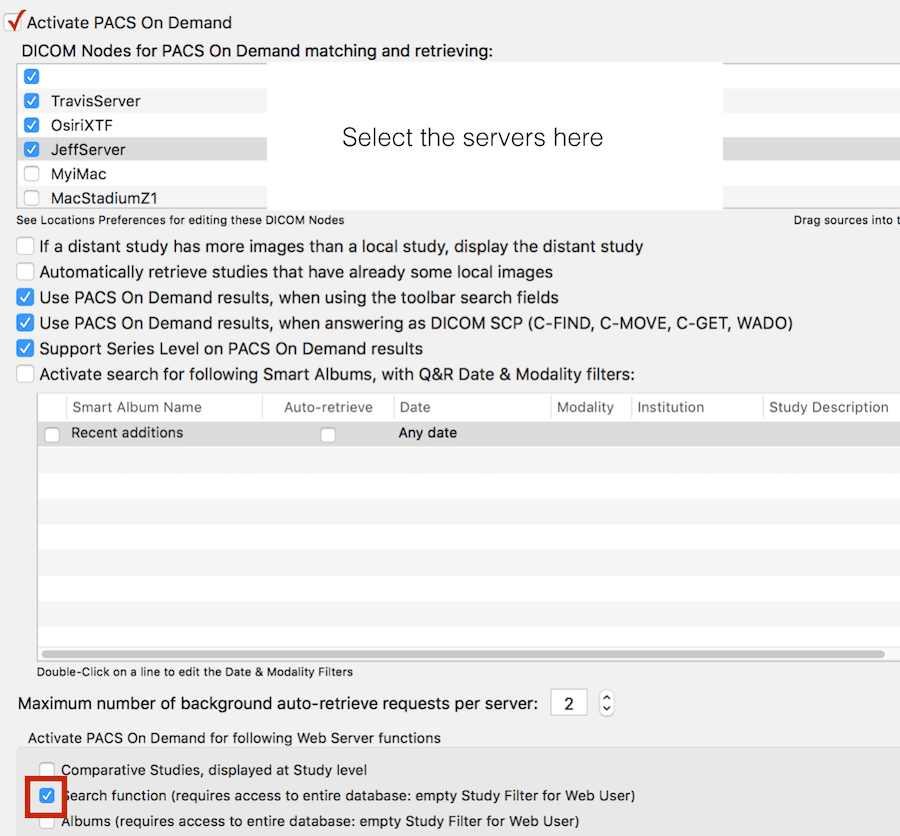
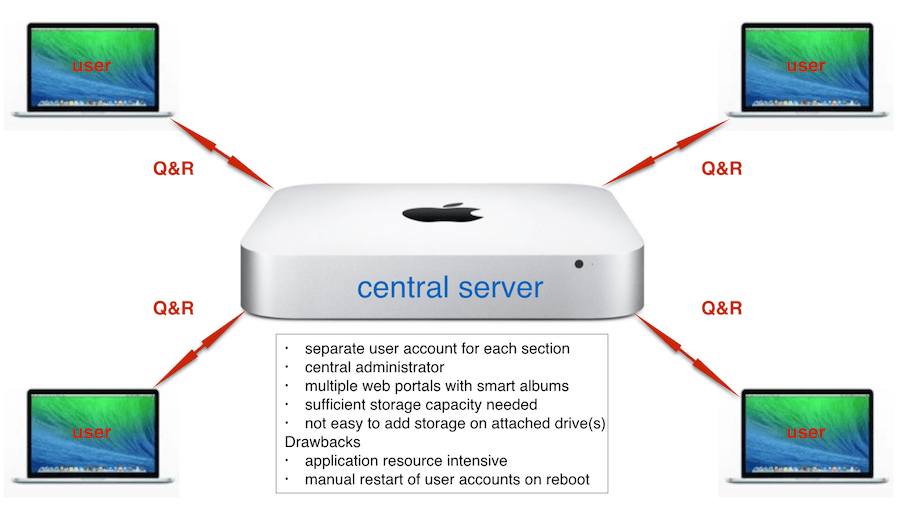
It is the case that a user can easily login to any Web Portal directly, not shown in the graphic above. One simply has to bookmark each Portal in the browser. But a great way to make this process more convenient is to establish a separate server— central server in the graphic—via which a User may query any of the network-connected servers. The database of this server is initially empty. When a user retrieves a case from a connected server, the case is first added to its default database, and then forwarded on to the requestor. The next time the case is requested, it will be delivered from the central server. Its default database is gradually filled-up as users retrieve cases, so it needs sufficient storage capacity to enable this. The following configuration (in OsiriX: Preferences) needs to be done on the central server :
- each connected server needs to be configured in Locations
- Pacs on-demand needs to be turned on:
An administrative challenge in this scenario is the the lack of uniformity and consistency of presentation that will likely occur across multiple server databases. As you’ll appreciate in a moment, there are quite a few choices to be made in relation to database configuration and the proper anonymization and labelling of cases.
Multiple Web Portals on a single server
This can be achieved by establishing a new User Acoount on a device for each section. It looks like this:
An adminstrator will login to each User Account in turn, start OsiriX, and configure it. As each OsiriX instance will have the same I.P. address, each will need a unique AE Title and Port. In addition, each instance’s Web Portal must be configured with a non-identical Port. Because each Web Portal is separate, Smart Albums may be configured for each, as mentioned above. A user can bookmark each Web Portal’s address in the browser.
This setup works. Because mutiple instances of OsiriX are running simultaneously on one device, it is relatively resource-intensive. One drawback to this strategy will become apparent when the device reboots, which is not uncommonly necessary, for example, when software upgrades are done. The administrator will then have to login to each User Account in turn to start OsiriX. This may not be too onerous particularly when Fast User Switching is employed, but it’s inconvenient.
Sufficient storage capacity is required on the device to accommodate all the databases, anticipating further needs as well. If you run out of space in this scenario, it’s relatively difficult/laborious to remedy.
If this method is employed and a decision is later made to put each database on a separate device, it’s very easy to do. Each applicable OsiriX Data Folder may simply be copied to the new device, replacing the default Folder created when a new OsiriX instance is created.
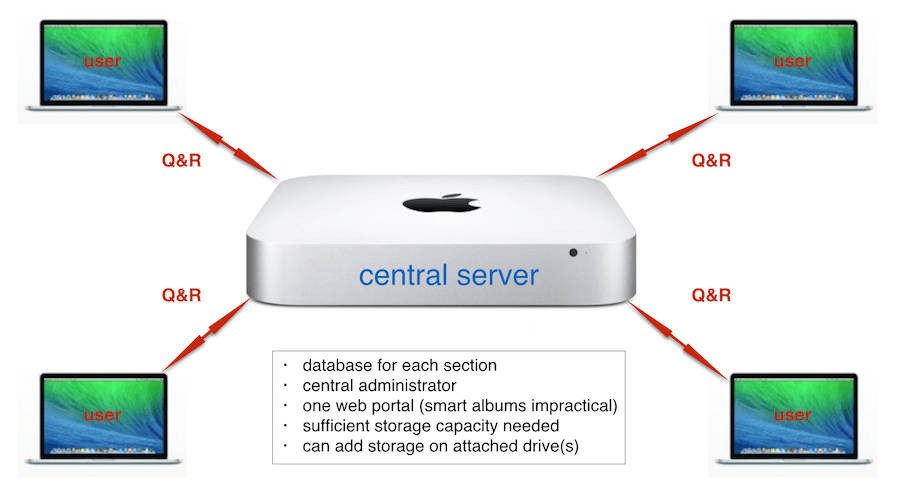
Multiple OsiriX databases on a single server
This may be the most appealing configuration. On one device separate databases for each Section is created. A user will able to query the Web Portal for cases in any of the databases. The architecture is this:
The databases should be created in a new Section Databases Folder in the Documents folder of the Home folder of the adminstrator. In my case this would be /Users/howardm/Documents/Section Databases. Each subfolder here would be labelled Chest, MSK, etc. After each Folder has been created, go to OsiriX and choose the menu item File: New Database Folder... and create a new OsiriX Database in each of these folders sequentially. Once this has been done, the Databases will be listed in the Albums & Locations drawer in Locations beneath the Documents DB
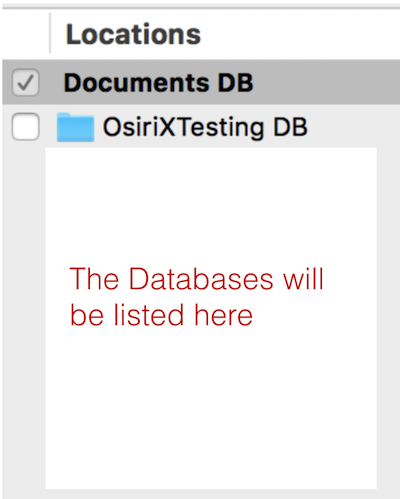
When you click on a Database here, its contents will be revealed. At this point each is obviously empty. The default Smart Albums will be displayed. Delete all of these. Do the same for each Section Database. You will only have to do this once. The only Smart Albums that are needed are those applicable to the Documents DB.
Once you begin to populate each Database with cases applicable to that Section, click the box next to each Database as shown here.
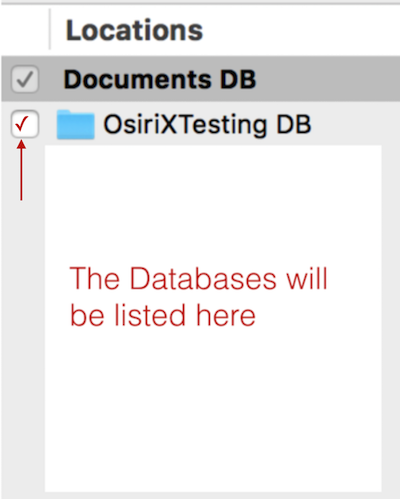
This brings the Databases “online.” A Database without its adjacent box checked ( ✓) will not be accessible via a query through the Web Portal.
(Note: this last option is not presently available in Horos.)
The way to populate each Database is with a drag-and-drop action from the Documents DB after the case has been properly prepared for inclusion.
After this, the case should be deleted from the Documents DB so that this Database is a temporary waystation to a Section Database.
The advantages of this architecture are:
- each Database is separate. It may be copied and moved anywhere else.
- if the storage capacity of the device drive is exceeded, an external drive may be attached and a Database(s) moved to it. OsiriX readily works with Databases on attached drives
If you delete, or move a particular Database on the drive (or on an attached, mounted external drive) to a different place, you can delete it, or add the path to the new Database location, in this section of Preferences: Locations

All the active Databases will then be properly displayed in the Albums & Sources drawer under Locations.
Particular items that need to be considered and configured
There are quite a few general configuration and administrative issues that pertain to a departmental Teaching Case File irrespective of the choice of network architecture. I’ll discuss these now. Note that many relevant guidance documents are available on this web site.
Ensuring that all the component Studies/Series of a case are merged
When a case is imported into OsiriX, it is often the case that the component Studies/Series of the case are listed on separate lines in the Database Window. For example, the radiographs, CT, and MRI components of a case are on separate lines. These should be merged: Select all and choose File >> Merge Selected Studies from the OsiriX menu.
In the Dialogue Box that appears, select all three options as indicated below

Note: At present, this quick “unify” option is not available in Horos.
Ensuring that each case has a unique DICOM identity
Users will retrieve cases from a Web Portal. The transfer process involves the so-called WADO protocol — Web Access to Dicom Objects. This involves a particular item in the metadata of the case: StudyInstanceUID This must be unique to each case.
The StudyInstanceUID for a particular case will be of the form: UID root.Case number, appending the Case Number to the UID root. For a departmental Teaching Case File, I recommend that you get a departmental UID root from the Medical Connections website. Fill in the form and an UID prefix will be e-mailed to you within a few hours. Add .1. at the end of the number for your Thoracic Section, .2. at the end for your MSK Section, and so on.
So, for a Chest Section Case Number 02303 (as an example), and a root UID of 1.2.826.0.1.3680043.9.5830.1., (example from my personal Teaching File) the complete StudyInstanceUID for the Case will be: 1.2.826.0.1.3680043.9.5830.1.2303
If you forget to insert the Section Number, a person querying a case with a Case Number of 00200 might get a different case 00200 from another Section.
Note that the leading zero in 02303 must be removed. And pay attention to the locations of the periods in the number.
You can insert the proper StudyInstanceUID for each case during the manual anonoymization process in OsiriX (which will remember it; but don’t forget to change the number for the applicable Section). Or, you can use a great free app— DICOM Anonymizer. Read this guidance document.
Store data as JPEG 2000-compressed images
Data stored in this state will result in smaller case packages— taking up less space on the drive and transferred faster to the requesting person.
Review this document on the web site for a recommended configuration.
Configuring the Database Window of the Server
This concerns the following section of the Database Window:
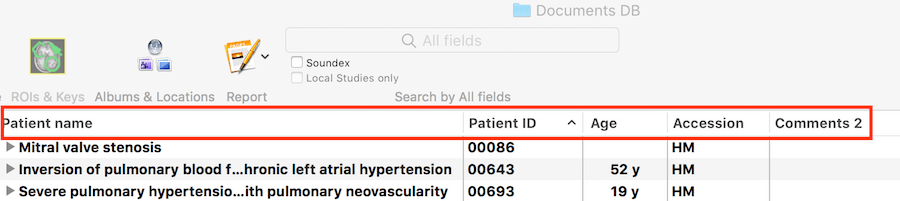
Show the necessary Fields by right-clicking on that line.
I suggest the following:
- Patient name : Diagnosis (Important: the Diagnosis should not be more than 64 characters— a DICOM standard)
- Patient ID : the case number in the Section Database
- Accession : the initials of the contributing radiologist
- Comments : the title of the Section, such as
Chest,MSK,Neuro, and so on. - Comments 2: keywords, to facilitate searching for a case and the creation of Smart Albums (the latter in the future if a different strategy is employed). Don’t put keywords in the Comments field. A hint to the Diagnosis will be revealed when showing the case.
- Comments 3: your choice (it could be R1, R2, R3 or R4, representing the “difficulty” of the case)
- Comments 4: your choice (it could be “pub” if the case has been published, to avoid duplicate publication)
- Database: show this field. It will indicate which cases are in which Database. Remember that the administrative goal is to edit/prepare those in
Documents DBproperly, transfer them to a Section Database, and then delete them from the Documents Database.
Notify section members about new cases by e-mail
If individuals are interested you can easily and automatically send them an e-mail notification. Review this guidance.
Because you’ve recorded Section in Comments, you can use this as a syntax filter so that the member is notified only about new cases in his Section.
Consider a department - or section-wide report template
It’s nice to have a Case Summary (in DICOM-PDF format) for each case using the same Template. I use Pages and here is the template I use for my personal Teaching File. Modify it as you wish, with your own “logo” of course, rename it OsiriX Basic Report.pages, and put it in the PAGES TEMPLATES folder of the OsiriX Data folder after renaming the ones already there something else as backups.
Backup the server
Of course, you’ve heard this before: configure a reliable way of backing up the server, on at least a daily basis, using two methods: to an attached drive and an account in the Cloud. If you’re lucky, your institution may provide you with a free storage account in a service like Box for the latter.
I heartily recommend an app I use to do this : Arq
Use it to configure a backup schedule and to direct the backups to the appropriate location. Arq can do this for an attached drive, a local (synced) folder, and certain Cloud Storage Providers.
As of January 11th, this is the first version of this guidance. If you have any questions, or suggestions for additions to it, let me know. Send questions by joining the Community Forum so that others can benefit from our discussion.
Cheers!