Mar 16, 2013
Accessing And Using An OsiriX Web Portal
Contents
- Login to the Web Portal
- After logging-in to the OsiriX Web Portal
- Anonymizing and uploading cases to the OsiriX server from the Web Portal
Login to the Web Portal
The IP address for an OsiriX Web Portal typically has this format: http://x.x.x.x:3333. It’s simply a matter of putting the address in a browser.
Update: May 2014
I have now relocated my Mac mini server to a colocation facility. It is here: chestrad.net:3333
After logging-in to the OsiriX Web Portal
Options for viewing cases
Once you’re logged-in, you’ll see the following (or very similar) page:

You can search by using a Diagnosis Keyword(s), for example, aortic, for diagnoses that contain that word. Try different keyword(s), preceded and followed by an asterisk, the Wild Card character used in programming applications.
You can also simply browse through the Study List of all the cases or the OsiriX Smart Albums that the Teaching File creator has chosen to create.
Tip: Because you're using a browser, you can also use its Search Function "Command-F (Mac) or Control-F (Windows)" to search for cases on the web page using appropriate keywords.
After you login to the Web Portal and find a case you want to retrieve, there are three choices as shown in this graphic:
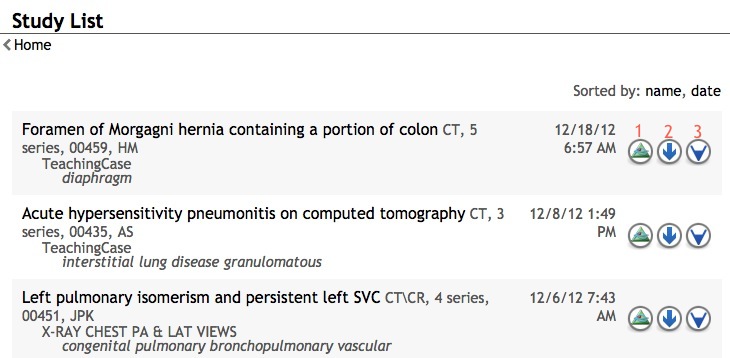
- WADO retrieval directly to your OsiriX database. If you’re using OsiriX, this is the best method.
- Download a case as a Zip file. You can then view the case with any Dicom viewer.
- Download the case and view it with the Weasis viewer.
If you select to view the case with Weasis, the java-based Weasis Viewer will automatically be downloaded to your computer, started, and the case retrieved into it. (You have to permit java applications to be downloaded and run on your computer.) It’s a great way to view the case if you don’t have OsiriX.
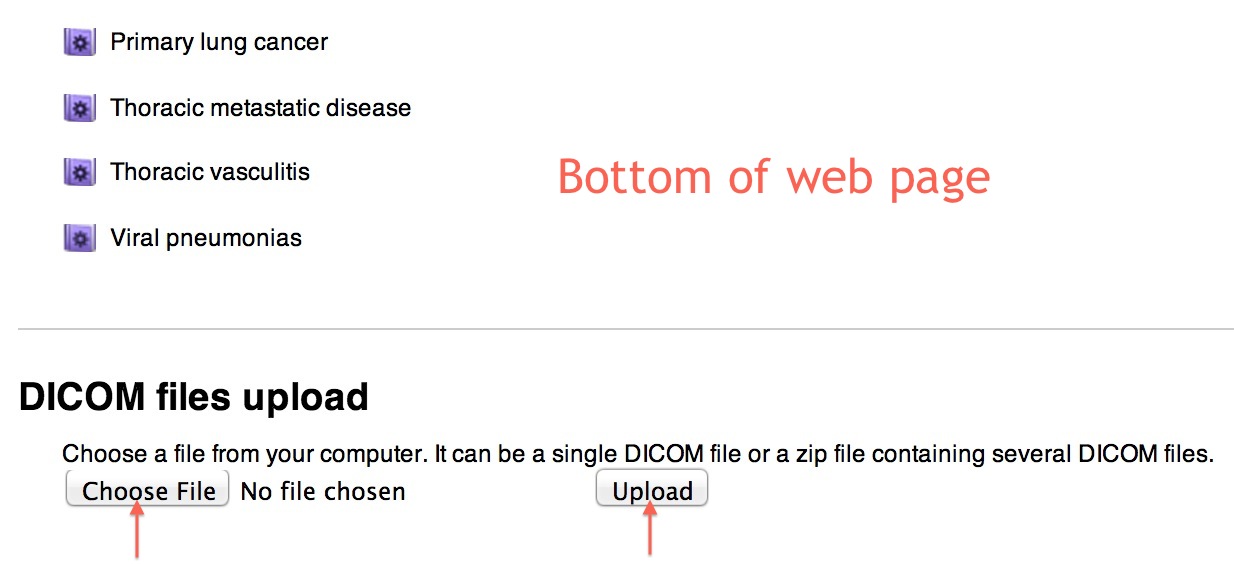
Anonymizing and uploading cases to the OsiriX server from the Web Portal
If your login is associated with Upload Permission, you’ll be able to upload a Zip file of a DICOM case(s) :
Update: December 2015
If you want to send me a case, and do not have Upload Permission, please send it to me via e-mail. I’d appreciate it and will give you full credit!
Important: Remember to anonymize the case before uploading it to the Server
If you have OsiriX, you can use its anonymization function to accomplish this.
Here is the scheme I presently use:
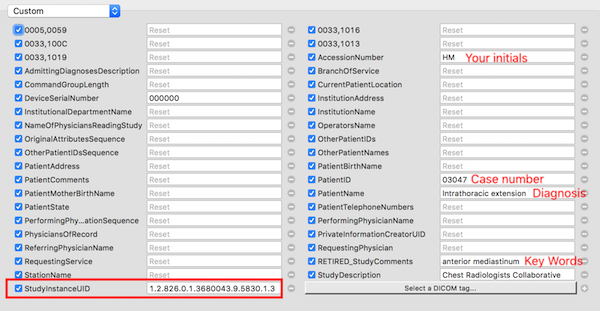
Tip: When you use the "Merge" command in OsiriX to merge all the Studies (e.g., radiography, CT, MRI) of a particular case before anonymizing it, the component Studies will be split again when you DICOM-send or Retrieve it from the Server. This is annoying! Prevent this by putting an appropriate number in the DICOM Tag "StudyInstanceUID", as indicated above in the graphic.
This number should be derived from your personal UID root (prefix) that you use for all the cases in your Teaching File(s). Review this guidance for information about getting this prefix and how to use it. It’s easy!
The Diagnosis you insert should not be longer than 64 characters to comply with the Dicom Standard.
With all the DICOM tags I’ve added to this scheme most cases are anonymized such that all personal information is removed. But not always. Scroll through the metadata of a Series of a case to be sure that none is left. If any remains, use the manual method to remove it. (You can also use the following manual method to edit any particular field(s) in the DICOM Header (Metadata). )
The Manual Method
OsiriX permits one to edit any particular field in the DICOM header. This is a three-step process as indicated below:
- Activate the editing function by clicking on
edit. - Double-click on an entry to edit it and hit return. Edit other items as necessary.
- Click
Applyspecifying theStudylevel so that all the Studies (and component Series) of the Case are changed.

Using DicomAnonymizer to anonymize cases
If you do not use OsiriX to anonymize a case, a great application to do this is Dicom Anonymizer.
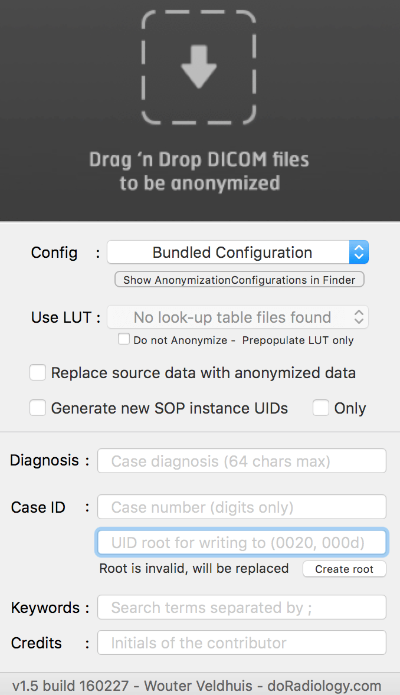
Review my guidance document on this web site for details about getting and using it.
Removing personal patient information embedded in an image
Sometimes, for example, with an ultrasound image series, PHI is embedded in the image and cannot be removed by editing the DICOM header. In this case, the relevant portion of the image has to be removed, the resultant image saved as a separate Series, and the original Series deleted.
The process is as follows:
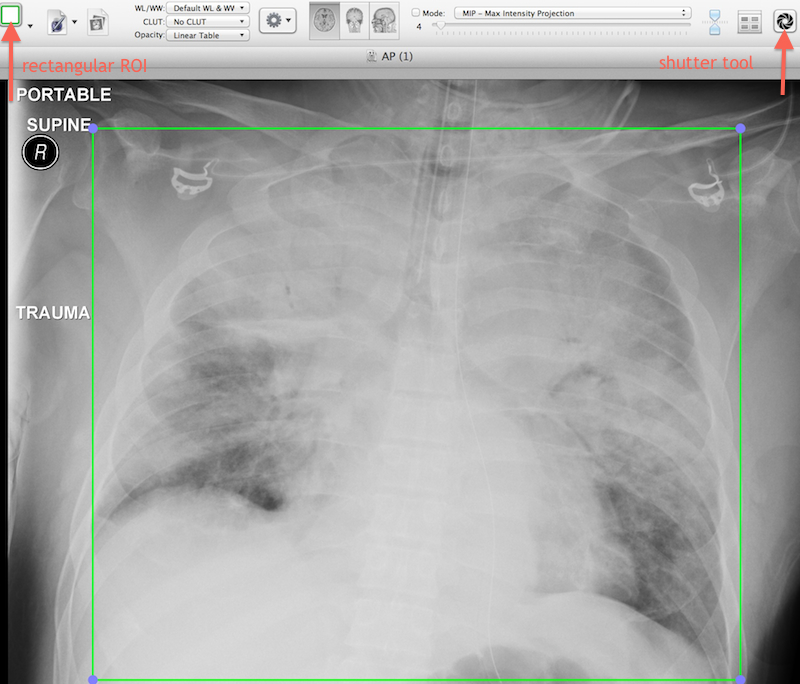
- Define the area to be retained with the
rectangular ROI tool. In the image below, I’m using this technique to exclude extraneous markers from a bedside chest radiographic image. The same process may be used for an ultrasound or nuclear medicine series containing many images. - Click on the Shutter Tool icon in the toolbar. If the icon is not there, right-click on the toolbar, choose
Customize Toolbarand drag it there. - This image demonstrates what you see just before you invoke the Shutter Tool
Next steps…
- Now that everything outside the ROI has been removed, use the Zoom and Pan tools to resize and center the resultant image as necessary in the window.
- Hit
Command-Eto save this as a new Series (named as you choose) in the case. For Image Format, specifyas displayed in 16-bit BWbefore clicking OK. - Delete the original series.
If you want to view an excellent video of this process applied to an ultrasound examination, do so right here (Credit: Dr. Mary Roddie, OsiriX U.K. User Group):
If you have a single jpg image with embedded personal information that you want to import into an OsiriX case, use the Preview application that comes with every Mac to crop out the information (or blacken it) and then import it into the case with the OsiriX menu item: Plugins...Database...JPEG to DICOM utility, specifying the Meta-data: from the selected study in Database window option when doing so.