Oct 25, 2014
Sharing OsiriX Teaching File Cases And Automating The Process
Automating the process of sharing cases with colleagues may be achieved by using applications and services available for OS X and included in OsiriX. Some of the applications come with OS X; others are available at no or modest cost. In this guidance document, I’ll describe a few scenarios and methods that you can directly use or adapt for your personal situation.
In order to automate the process, we’ll use the following functions, services and applications:
- A folder in OsiriX from which dicom files are automatically added to OsiriX’s Local Database.
- A service that provides shared folders the contents of which are synced between devices and/or users.
- Applications that monitor designated folders and perform actions prescribed by a user— all in the background.
Let’s review these in turn.
The INCOMING.noindex folder in OsiriX
This folder is in the OsiriX Data folder:
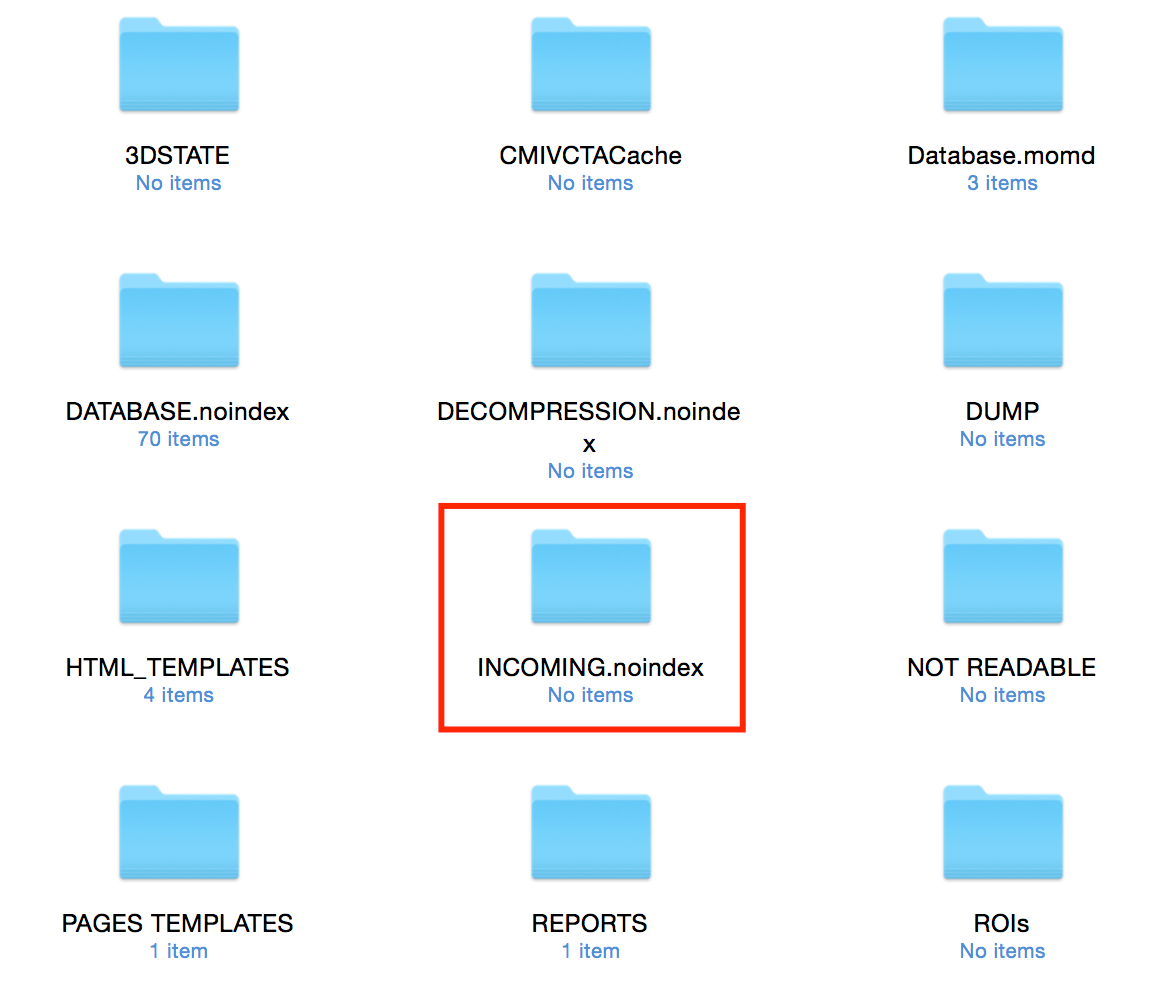
The relevance of this folder for our purposes is that dicom files put in this folder— in the form of files, a folder of files, or a Zip file containing folders and/or files —will automatically be imported into the Local Database (DATABASE.noindex). After importation, these items will then automatically be deleted from the folder. That is why, as indicated in the screenshot above, the folder contains no items.
All one has to do is copy or move the dicom files of a case into this folder.
Using an online service that enables the automatic sharing of files among users
One person creates a shared folder the contents of which are automatically added to (and synced with) the shared folder on other devices. The devices may all be owned by one user and/or by colleagues. Note that the synced feature means that if the files are deleted— or moved — from the shared folder by one person, they will be deleted from the shared folder on all the other devices. Remember this when working with the contents of a shared folder.
Using a service such as Dropbox or Box.
These well-known so-called cloud services typically provide a certain amount of free storage with inexpensive options for purchasing additional storage. To share files with others, each user has to have an account with the service. Any user can then create a shared folder and invite others to share that folder. If a user puts a case in the shared folder, it will be uploaded to the service’s server in the cloud, and then downloaded to the shared folder on all the other users’ devices.
If a case is inadvertently deleted, or moved out of the folder, one can retrieve the deleted files by logging into the account on the service’s web site.
Update June 2016: It is now not uncommon for universities to provide free storage space for faculty members using the Box service. Because the institution controls the storage process, it will even permit one to include Personal Information on it. This is a great option. Otherwise, many other cloud-storage providers and options are also now available.
Once you have set up the shared folder, the easiest way to export a case to it from OsiriX is by right-clicking on the case in the Database window, choosing Export to Dicom file(s) and selecting the shared folder as the destination— and using appropriate options as shown in this screenshot:
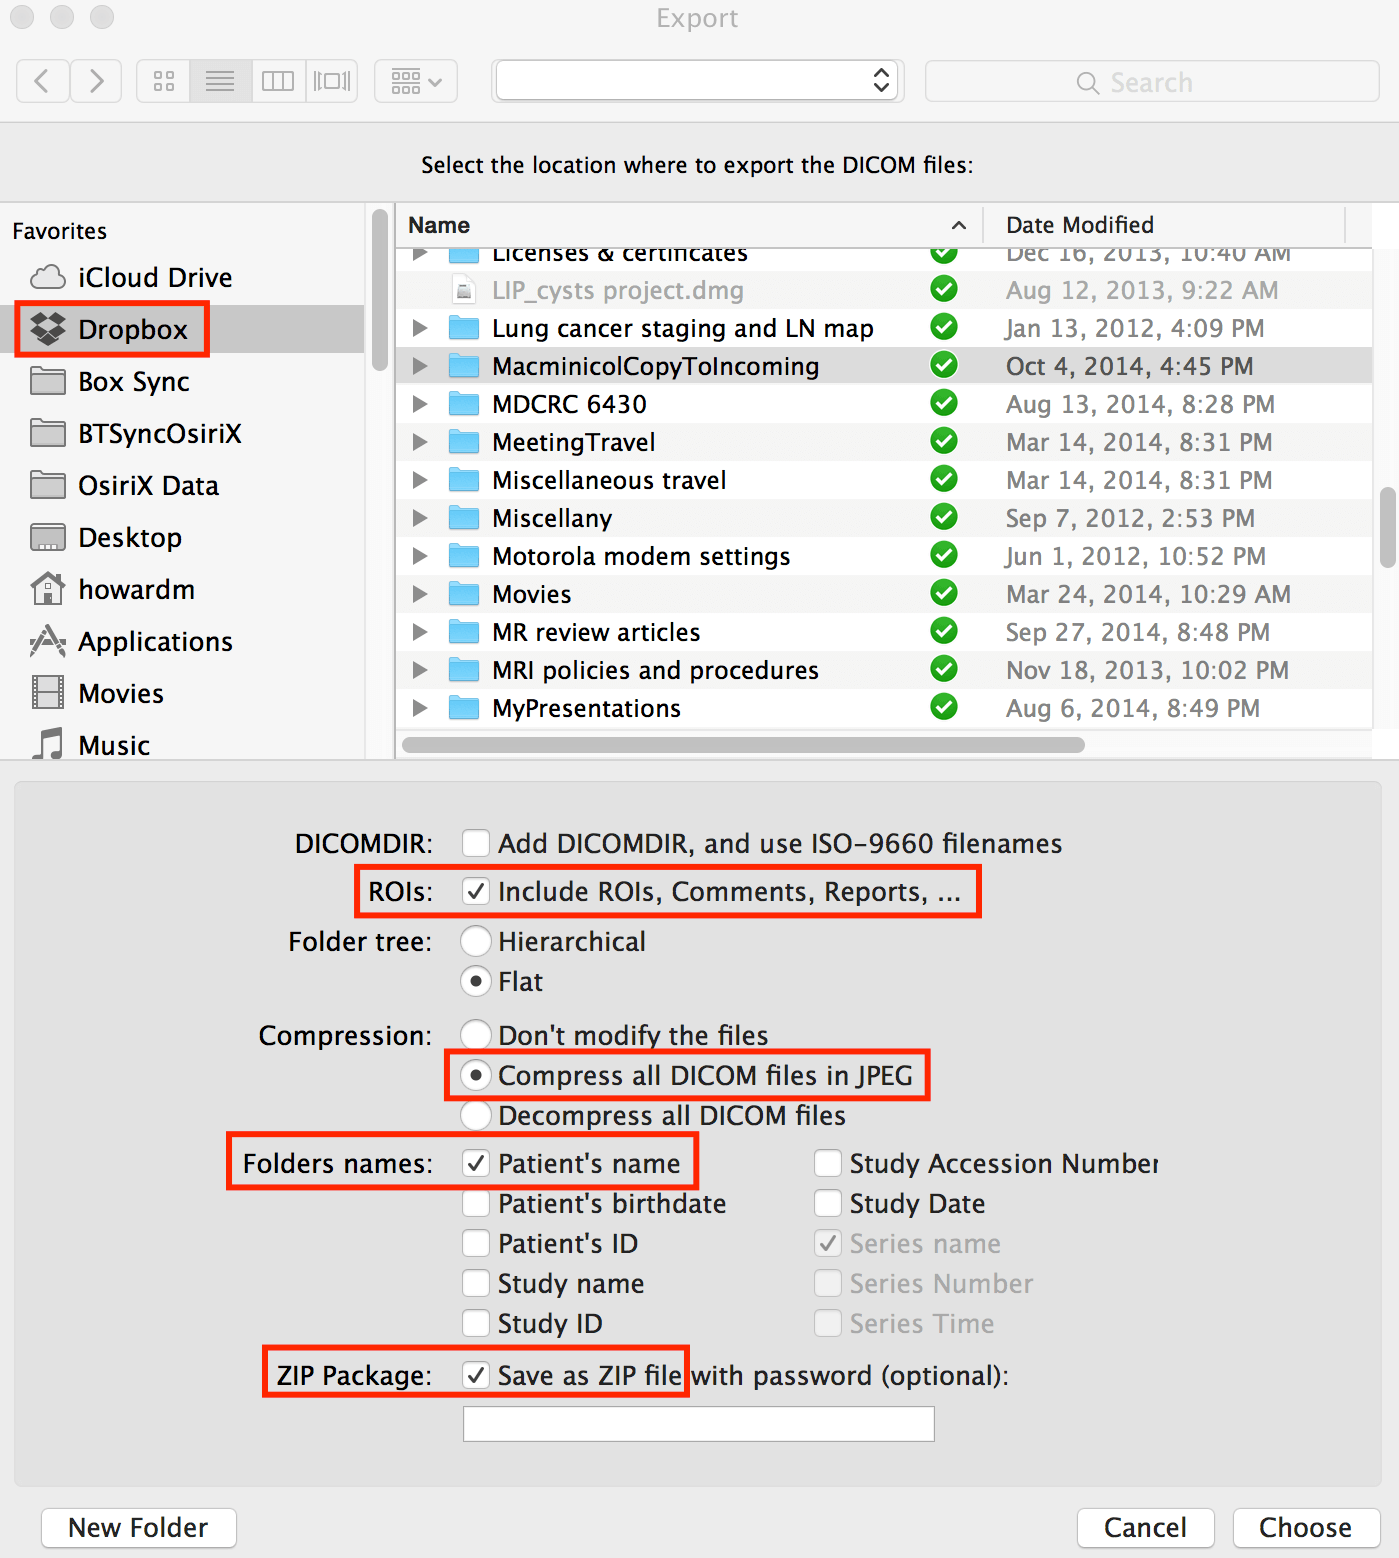
Note the following about the options:
- export the case as a Zip file. This greatly facilitates the use of a synced folder service.
- it’s best (but not mandatory) to compress the dicom files with the JPEG 2000 algorithm. Please see the guidance document on this web site for details about this.
- Because you replaced the patient’s name with the Case Diagnosis during a prior anonymization process, the exported folder will be named with that diagnosis.
After the files are imported into OsiriX from the shared folder, they should (at some point) be automatically or manually removed from that shared folder. In this way, a service such as Dropbox will be used as a “conduit” for moving files, which will not accumulate in the shared folder, using up any particular user’s allocated storage space.
In the next section, I will describe how to automate the process whereby files in the shared folder are automatically imported into OsiriX and, where applicable, later removed from the shared folder.
Automating the importation of cases into OsiriX
When a colleague sends you a case by putting it in a shared/synced folder, it would be nice if it were automatically imported into your OsiriX database. If your computer is not turned on, or your OsiriX is not running, the case will still simply show up when OsiriX is started and enough time has elapsed for the data transfer to occur.
There are two options for automating this process: using the Automator application on your Mac, and using Hazel, an application available (at the time of this writing) for $29.
Creating a Folder Action using Automator
When Automator opens, choose Folder Action as your task, and apply it to the shared/synced folder.
The following graphic demonstrates the actions you need for this workflow (applied to a shared Dropbox folder in this example):
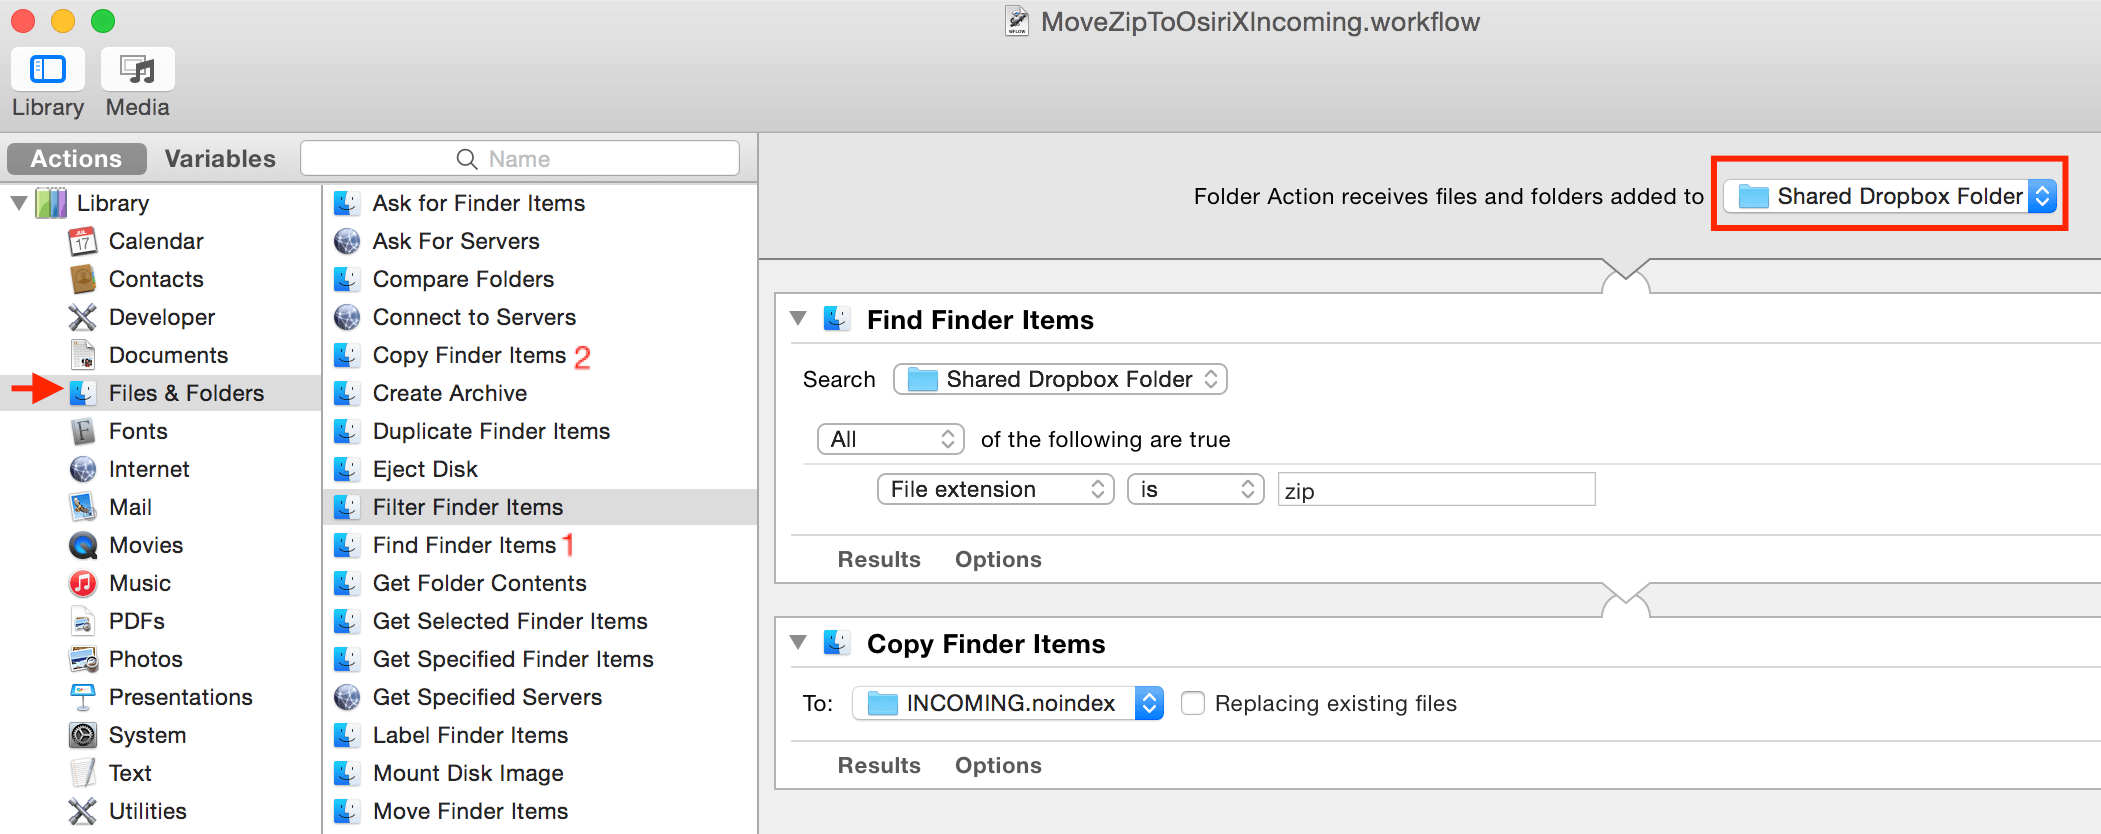
Important: If you’re using this process to send a case to another Mac you have, you can choose Move Finder Items for the second action on the recipient device. Choose Copy if you’re in a group of colleagues sharing cases. Then, after a week or so, when everyone has had a chance to get the case, one designated person in the group can then manually delete the case from the shared folder.
Using Hazel to automate this process
One limitation of Automator is that the Folder Action is triggered only at the time a folder receives files. It would be nice to have an application that continually watches a folder and completes a designated action when certain conditions are met— for example, deleting files after one day has passed.
In addition, things get complicated when multiple dicom files, instead of one Zip file, are streamed via the Internet into a shared folder. The first transferred files trigger the Folder Action, which is often then completed before all the files of the case are addded. That won’t work.
This is where Hazel is very useful. One can configure it much more extensively.
Note of encouragement: The following will seem rather complex, but if you review it slowly, the logic becomes clear
In the following example, I’m using Hazel to move a case from my office iMac at work to my laptop OsiriX. I (remotely, if necessary) use the dicom-export function of my work PACS to send a particular imaging examination to my iMac’s OsiriX Database. Then, Hazel copies the dicom files into a designated synced folder. The process then occurs as described above.
There are two rules for the originating iMac:
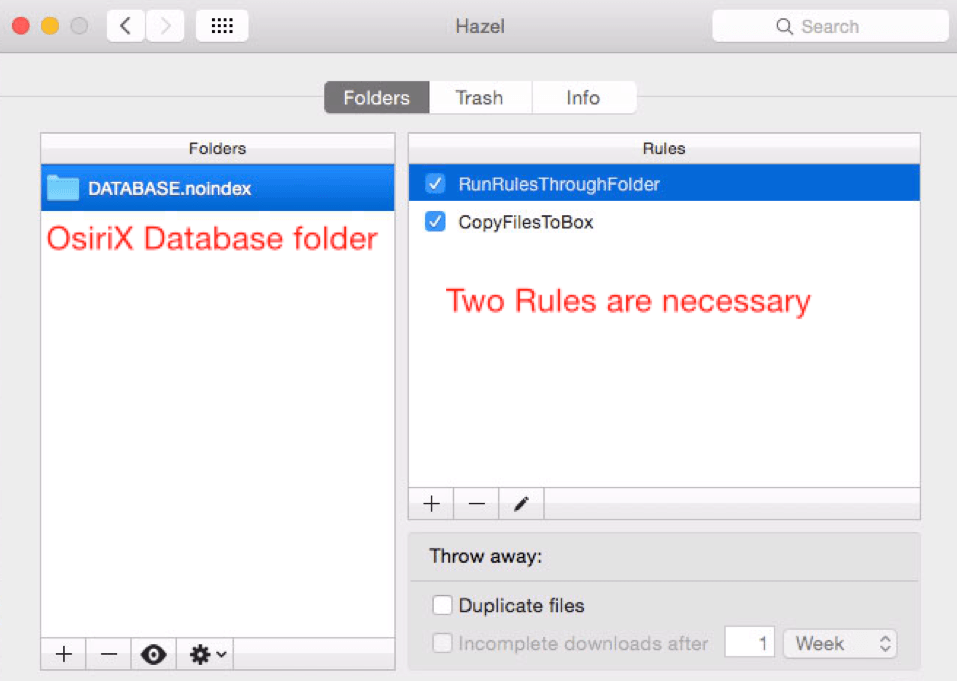
And here are details for each rule:
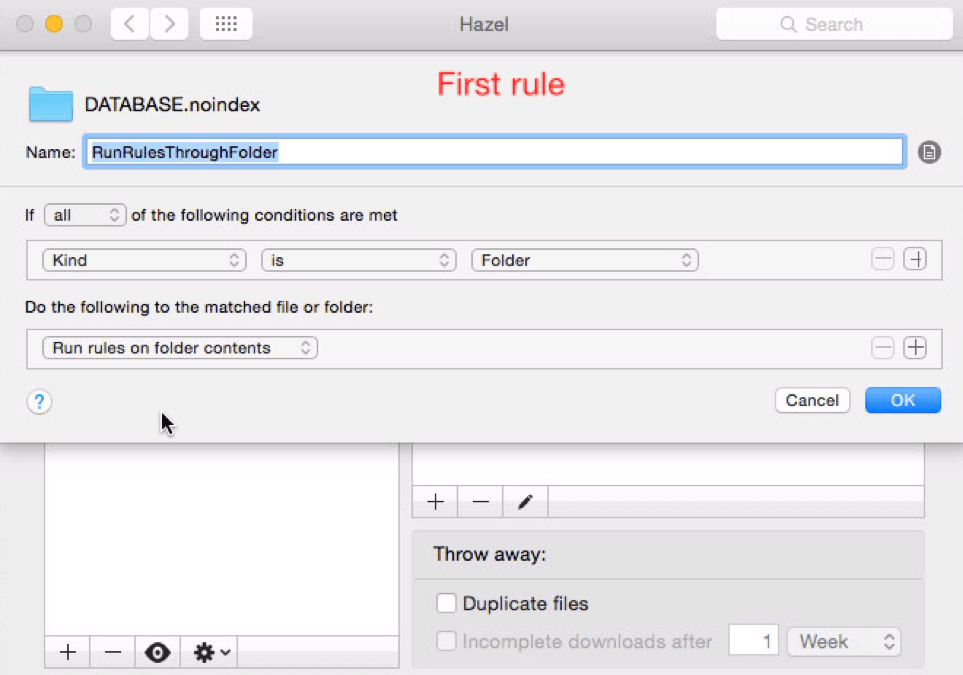
This rule is necessary because the OsiriX database folder has many subfolders for the dicom files. The second rule will run through all the subfolders sequentially.
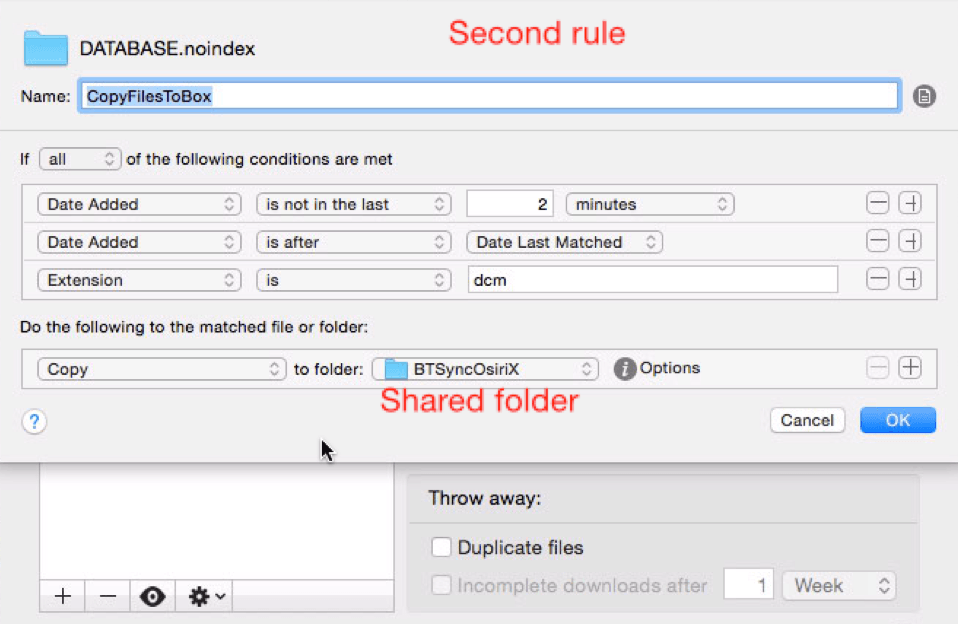
In summary, the rules are only applied to new cases added to the Database. And the rules are configured to deal properly with files streamed to the device over a network.
Here are the rules for the recipient Laptop. The first imports the files into OsiriX, and the second deletes the files after one day:
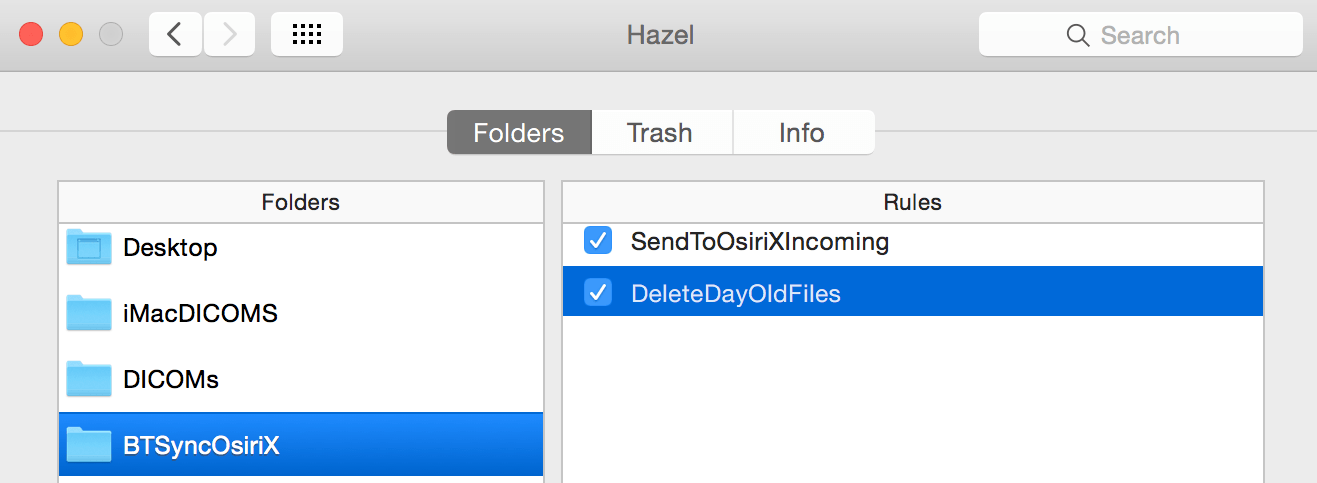
And the details of the two rules:
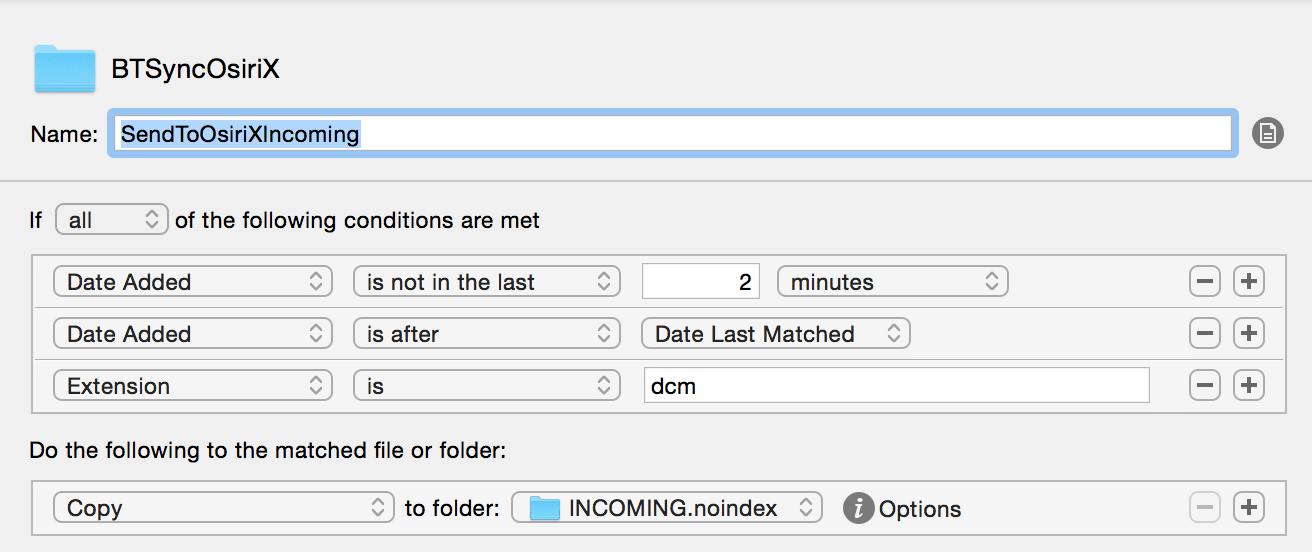
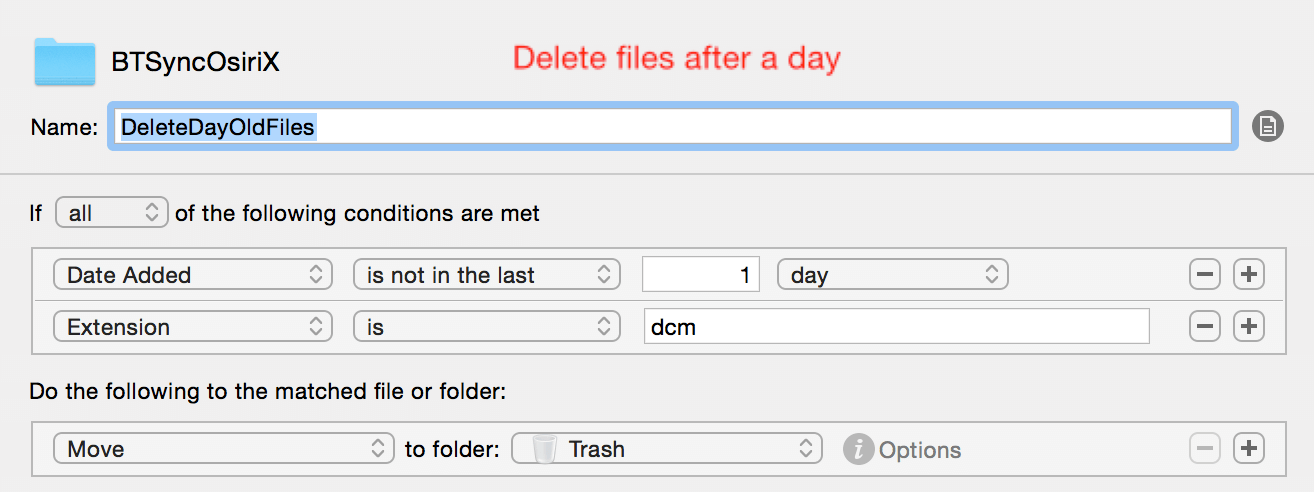
Once you’ve configured this correctly, everything will happen in the background without any manual intervention on your part. You can use this example to configure other Hazel processes for your personal needs.
One benefit of using Hazel is that you can use it to accomplish other useful things on your Mac. For example, I use it to:
- delete reports from the REPORTS folder in my OsiriX Data Folder. I don’t need to keep these.
- delete files in my /Library/Mail Downloads folder. Everytime you Quicklook an e-mail attachment, the file is deposited in this folder.
- delete files deposited to my Trash folder more than a week ago.
That’s it.
Let me know if you’ve configured other useful actions to deal with OsiriX cases. Or if you have a question about this process.