May 01, 2016
MedFilm: A DICOM Viewer For The IPad
Many users would like to retrieve and view DICOM images on an iPad rather than a Mac laptop or desktop device. A great application, MedFilm, is available from the App Store and is presently free. (An Android version is under development.)
The app has been developed by Fuli Wu, an Associate Professor at the Zhejiang University of Technology, Hangzhou, China. Many thanks for developing and making this available to the medical imaging community!
In this document, I’ll describe options for getting imaging examinations into the app and how to view images. Install the app as you would any iOS app (it requires iOS 7.0 or later). If you’re viewing this document within the app’s Help window, I suggest you switch to the landscape orientation if you’re presently in the portrait mode.
Table of Contents
Settings
When connected to a WiFi hotspot, the application will create default (Dicom Listener) settings. Mine are shown below.
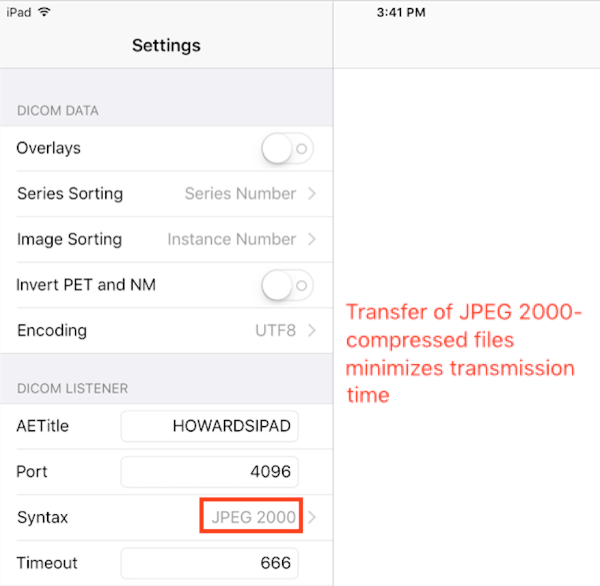
You may change the AETitle and Port Number if you like. I have specified a longer Timeout and specified JPEG 2000 as my Transfer Syntax. A network involving images compressed with this algorithm facilitates the transfer of images, particularly important when data are transferred over the Internet. Review the guidance document on this web site concerning a JPEG 2000-based network for more details if you’re interested.
MedFilm will use WiFi as the default mode for data retrieval.
Getting Cases into MedFilm
There are three ways to transfer images to the app: by downloading and importing the images, typically in the form of a Zip file of DICOM images (MedFilm can also handle other archive formats such as rar and 7Z); by directly importing images from a Web Portal using MedFilm itself; and by a Q&R (query and retrieve) process involving a server to which you have authorized access. I’ll describe each of these in turn. Parameters relevant to both are on the Q&R panel on the app.
Importing or Sending a Zip file of images
It’s common for radiologists in the Chest Radiologists Collaborative to share teaching cases via a link to a cloud-based storage location, such as a Dropbox, Box, or Google Drive folder. (One typically gets a download link by right-clicking the folder and copying the public Shared Link.)
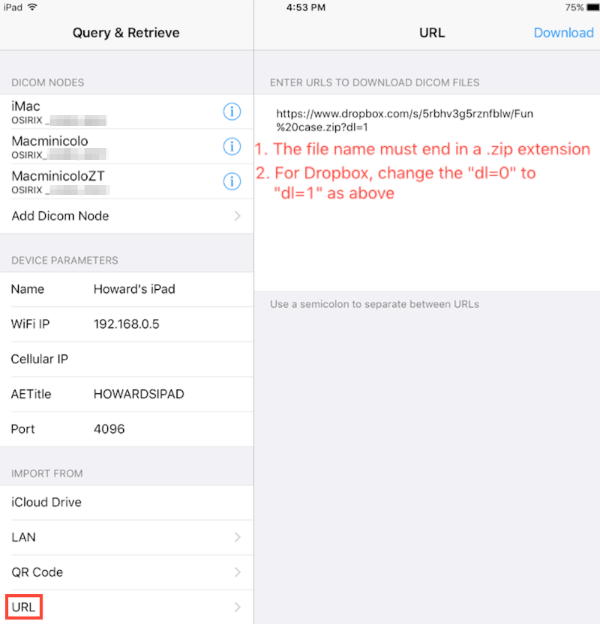
The cloud-based service typically produces a link to the folder that ends with the .zip extension. (Make sure that this is the case when you send the link to colleagues.) In the case of Dropbox, the link typically ends with ?dl=0. As shown in the screenshot below, change this to ?dl=1 after you copy-and-paste the link into the URL section of MedFilm. This will permit the direct download of the Zip file of images.
When you click Download and go to the Studies tab, you’ll see a message about Downloading on the top-left of the window. This will then describe an Unarchving and Importing process as the images are made available for review. As the study is added to the database, its name “oscillates” slightly, indicating that an action is occurring. Be patient as this process depends primarily on the transfer of images to your device over the Internet.
If you have an iCloud Drive storage account, you can use it to import the Zip file to MedFilm in the same way. Just use the iCloud Drive import option of MedFilm shown above: you’ll be presented with your iCloud folder on the iPad; choose the Zip file to import.
You can then delete the Zip file from iCloud Drive to make room for other items.
Importing a case from your own Dropbox folder
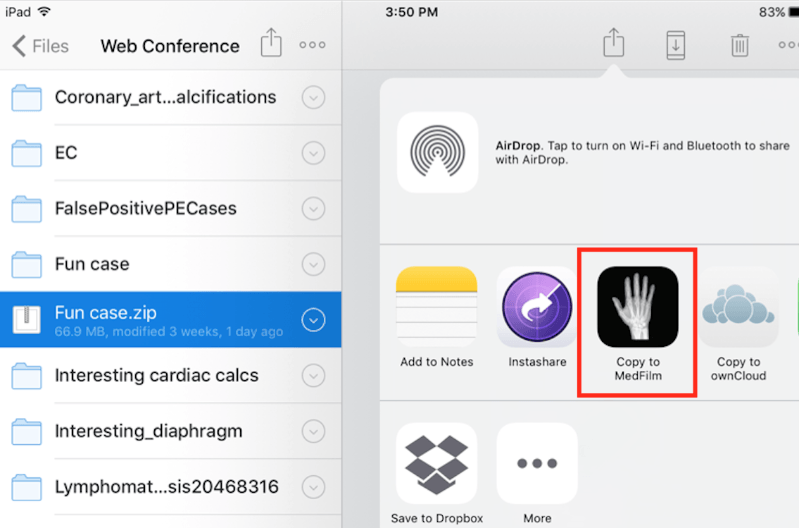
To import a case from your own Dropbox folder via the Dropbox app on your iPad, open Dropbox. When you select the Zip file, it’ll look like this:
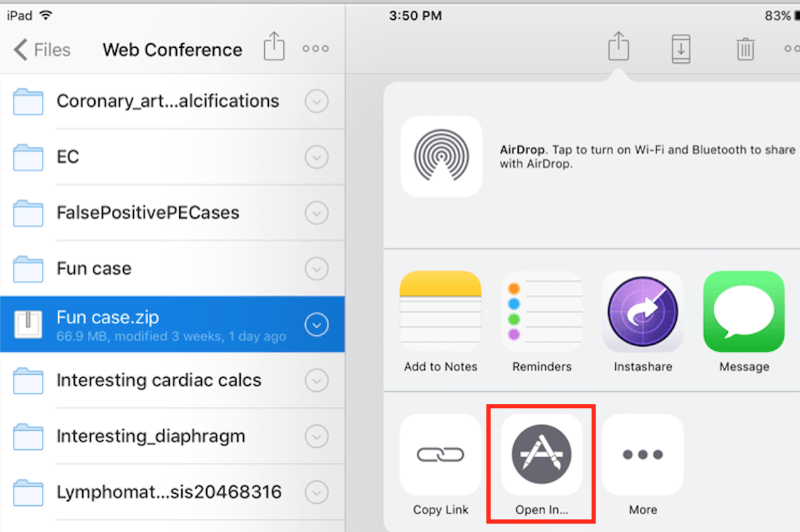
Select Open In... and then choose Copy to MedFilm
Finally, if you have a Zip file of a case on your Mac laptop or desktop device, and the device is online on the same Local Area Network (such as your home or work network via WiFi) as your iPad, you easily send the images to it (without connecting the devices with a cable) as follows: First, click the LAN tab and turn the HTTP Service on. The URL of your iPad’s HTTP Service will be shown.
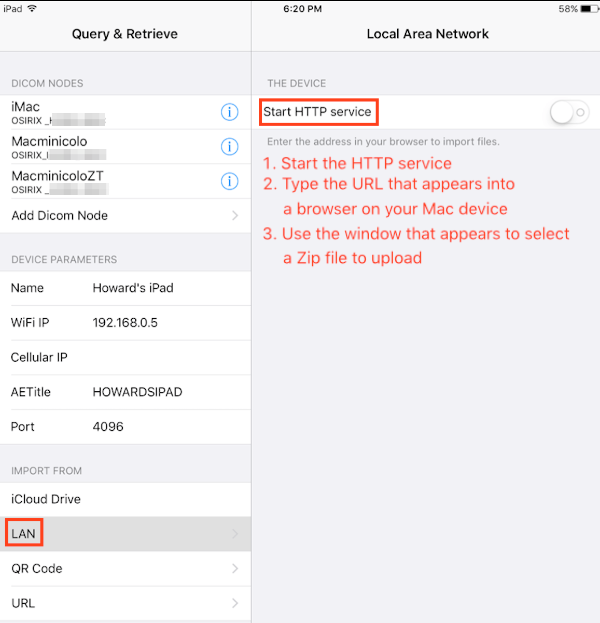
Now type this URL into the Address Bar of a browser on your Mac, and hit enter. You’ll be presented with a window that’ll permit you to navigate to a folder containing the Zip file, to select and upload it to MedFilm on the iPad.
Importing a Case from an OsiriX Web Portal
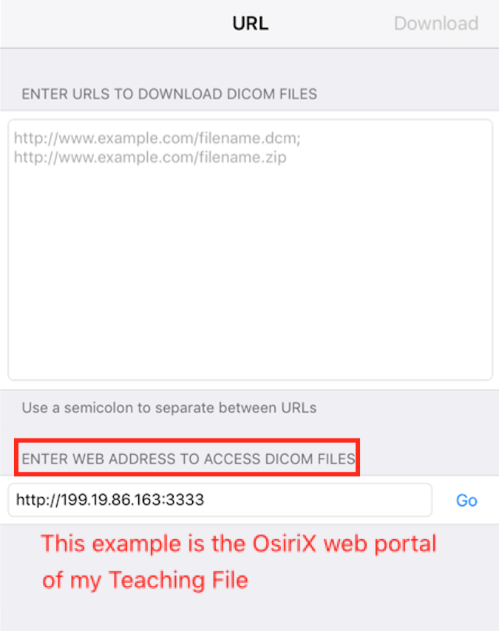
If you have access to a case on an OsiriX Web Portal, it’s very easy to import the case from there—without having to deal with a Zip file— directly into MedFilm itself.
The first step is to type the URL of the Portal into the relevant section of the URL Tab of MedFilm as shown below, and then click Go.
The Web Portal’s login page will then appear in a new window within MedFilm.
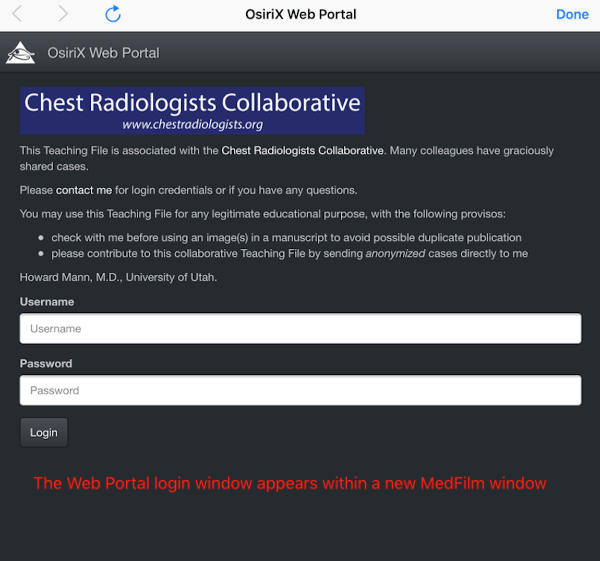
Login as usual, and find the case you want to download. Once you’ve done so, simply click on the green OsiriX icon. A popup dialogue will appear. Click OK and then Done.
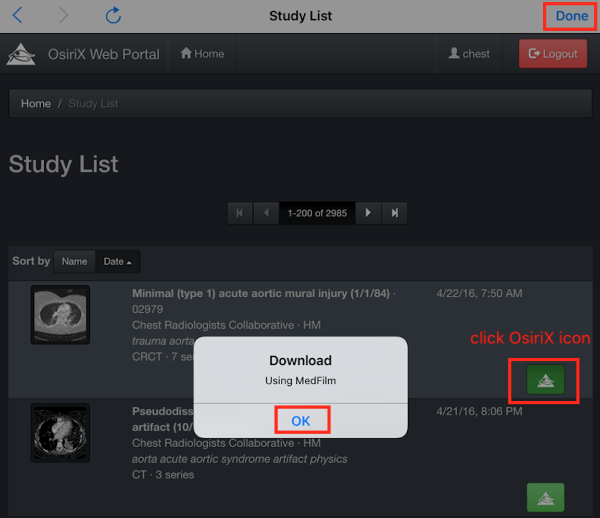
Go to the Studies tab of MedFilm to see your case downloading. If you’d like to download another case, simply go back to the Q&R Tab to do so again. When you’re done, go to the Web Portal and click its Logout button.
Getting a case directly from a server
If you’re “authorized” to query a server directly, you can use MedFilm to Q&R a case, in a manner analogous to getting a case from a clinical PACS server. You’ll need three parameters: the server’s AETitle; its I.P. address; and the Port Number.
If you have these, add a Dicom Node in MedFilm. The image below shows the parameters I’ve specified for a node
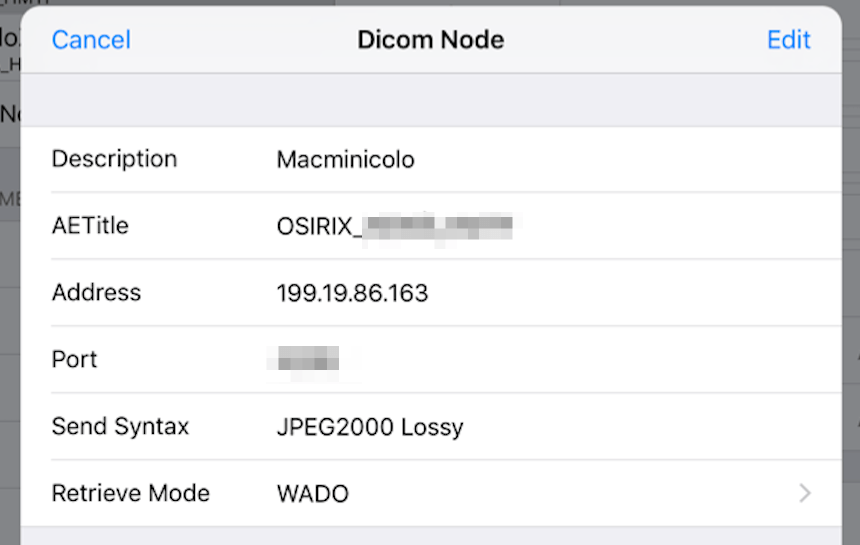
Once you’ve entered these three parameters, choose JPEG2000 Lossy or JPEG2000 Lossless as the Send Syntax, and then choose a Retrieve Mode: C-GET or WADO. I recommend WADO (whenever possible, as it is with an OsiriX server) as it’s a very transmission-efficient protocol. When you choose WADO, the default stored syntax (original syntax) will be used. That’s why all the images in my Teaching File are compressed with the JPEG2000 compression algorithm.
Note: Not every server is capable of storing and serving such compressed data. You may need to discuss this possibility with the IT managers of the server from which you retrieve images.
(For further details concerning these choices, review the relevant section of this guidance document on this web site.)
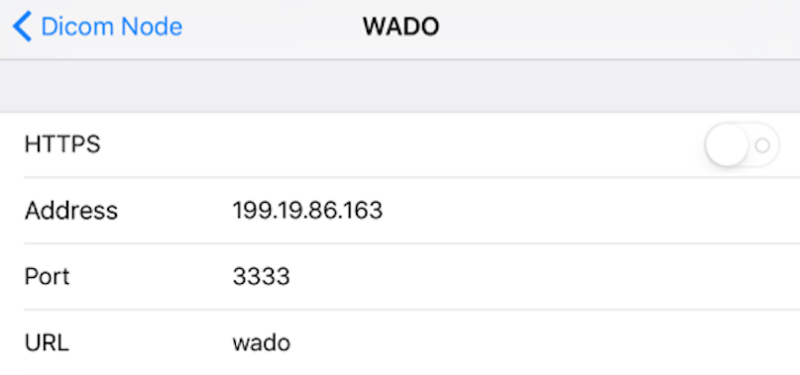
For an OsiriX server, specify the relevant WADO parameters, using the scheme shown below
Viewing Cases in MedFilm
Now that you have a case(s) in MedFilm, you’re ready to view them. Here are directions and tips to get you started:
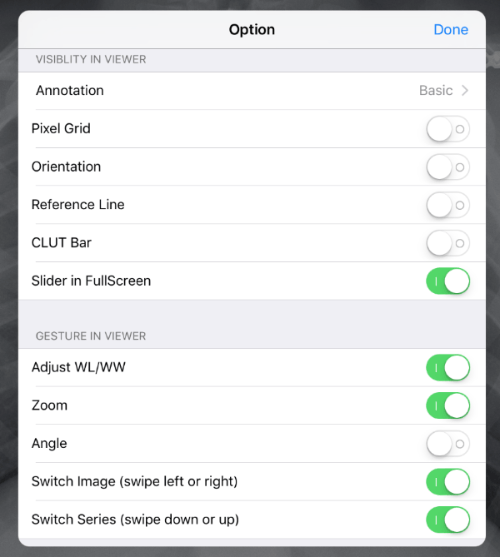
These are the Display Options I typically choose
Click on a Series to open it. Place two fingers (index finger and thumb) on the display to zoom and minify with a conventional pinch-out and pinch-in gesture, respectively. Similarly, use a two-finger gesture to pan and rotate the image. Double-tap with one finger to fit the image to the display.
To manually change the display parameters (window-width and window-center) put one finger on the display, hesitate momentarily, and then move your finger in the desired direction—relatively slowly to avoid a swipe gesture that’ll switch between Images in a Series instead.
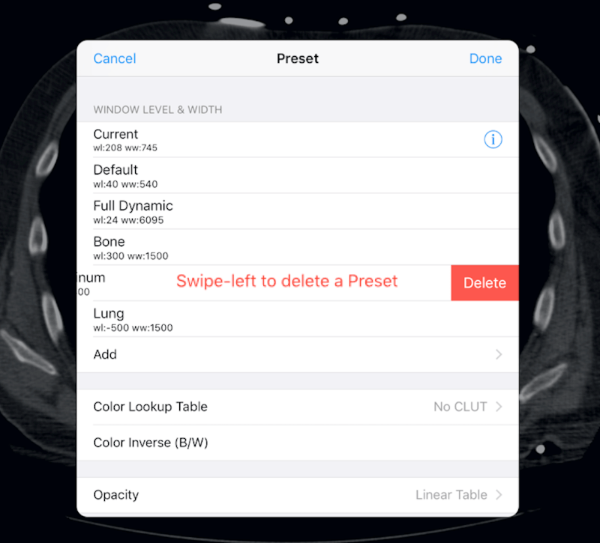
The Preset option allows one to choose a conventional preset. The same panel also allows one to create and label new presets. To delete a preset, use a conventional left-swipe and delete action
The ROI option permits a range of conventional measurements, such as length and attenuation values using a region of interest, as shown below
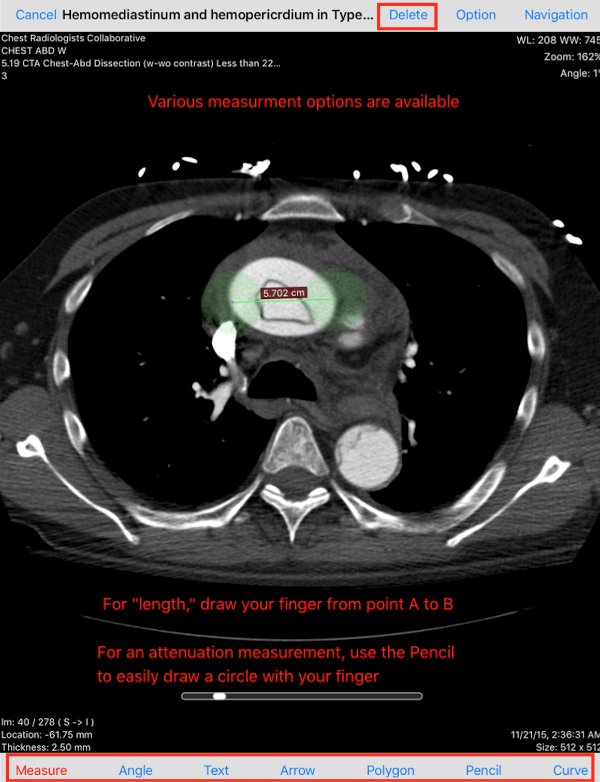
Tip: When measuring or creating a ROI on a small screen, zoom the image first. That'll make it easier to place the calipers accurately.
Navigating through a Series
Use the Slider Bar to scroll (slide) through a Series
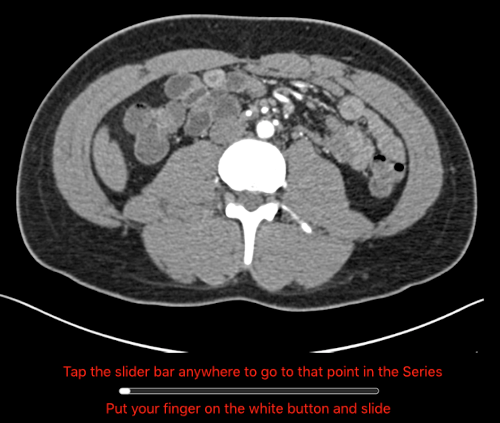
If the Series contains only a few images (such as a Key Images Series), you can also swipe left or right to move from one to the next. Do so by stipulating the option Switch Image (swipe left or right) as shown in the next section.
Switching Series

In this situation, swiping up or down will navigate between the Series in the case.
Note: When the Series or Image is a radiograph, the rendering of it will take longer than a CT or MR image—MedFilm displays the image in full resolution; the pixel dimensions are much greater.
Options for display of Annotations
One can choose which Annotations to display
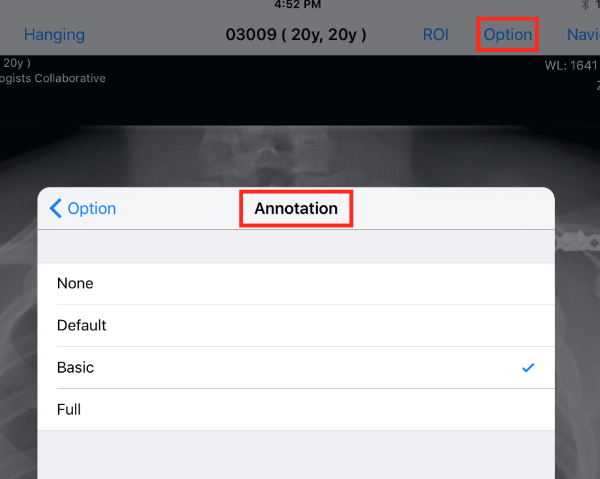
Tip: Choose the Basic option to hide the Patient Name or Diagnosis (for a Teaching Case) while still displaying other informational items.
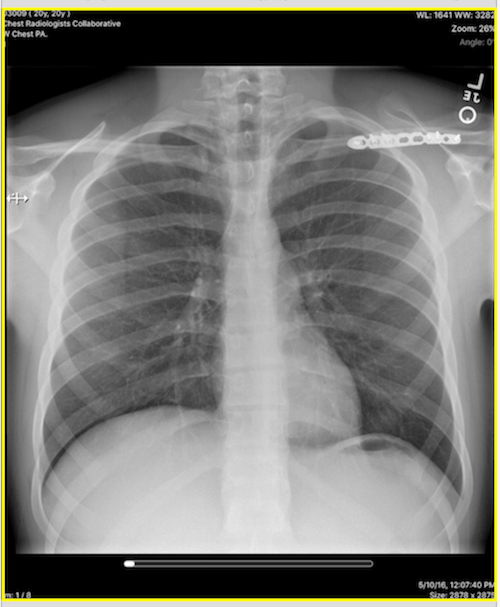
Identifying and navigating a Series of Key Images
A very nice feature of MedFilm is the identification and navigation through a Series consisting of specified Key Images. I often stipulate Key Images for a teaching case I create in OsiriX. OsiriX marks these as Key Images by creating so-called SR files in a dataset. MedFilm will display these separately in the Navigation Panel as shown here:

When you view this Series, it will have a yellow outline (exaggerated in the screenshot) as shown below:
For this Series, which typically has a limited number of images, view them by swiping left or right.
Explore the other options and functions of MedFilm on your own. They’re pretty straightforward.
Let me know if you have any questions concerning its use, or suggestions for additional capabilities. You’re also welcome to discuss the use of the app in the Community Forum associated with this web site.