Mar 22, 2013
Configuring And Operating An OsiriX Teaching File Server
Updated in December 2015
In this guidance document I’ll describe how to configure and operate an OsiriX-based Teaching File Server that will enable you to share your cases with colleagues.
If you and your colleagues put your individual servers on an Internet-based network , each network member will, in effect, have a Teaching File consisting of the cases on all the servers.
How this works will become apparent as you read this document.
Contents
- Hardware and Software Considerations
- Network Considerations
- Backing up the data on your Server
- Getting and anonymizing DICOM cases
- Configuring OsiriX on your Server
- Understanding a JPEG 2000 Teaching Server Network
- Querying a Server for Teaching Cases
- Exporting a case to share with colleagues
Hardware and Software Considerations
A Mac mini or iMac is fine as a Server. There is no need to utilize OS X Server. To use OsiriX for the purpose described in this document, you’ll need to purchase the non-free version. OsiriX Lite, the free version, has too many functional limitations, substantially increased since I wrote the first version of this guidance. Explore the Pixmeo Website for purchase options, including the possibility of a Site License for your department or practice.
If you can afford it, purchase a device with a SSD drive, and at least 8GB of RAM. The combination of a SSD drive and El Capitan (the latest version of the OS X Operating System as of Late 2015) will optimize the serving of images.
The average size of a Teaching Case on my Server is around 30-50 MB, the case being stored in a compressed state (JPEG 2000 compression). Many of my cases contain multiple CT, CT-PET and/or MR Series, each Series sometimes consisting of several hundred thin-section images.
If you choose a Mac mini, you can operate it via remote control (if necessary) using the Screen Sharing VNC application that comes with OS X. Other third-party VNC applications are available for this purpose but are not, as far as I know, better than Screen Sharing for this purpose.
Note that you can use iCloud and Back to my Mac for screen sharing as long as both devices are configured to use the same iCloud account. A guide for this is here. However, in my experience, this is not at all a reliable or efficient method.
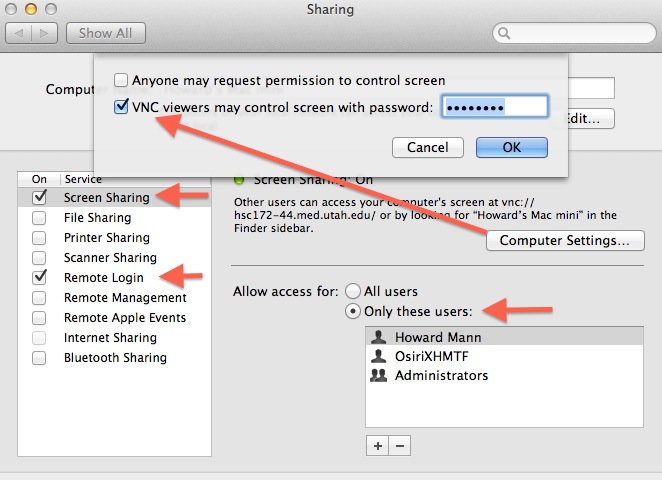
I suggest the following password-protected configuration (System Preferences) for Screen Sharing:
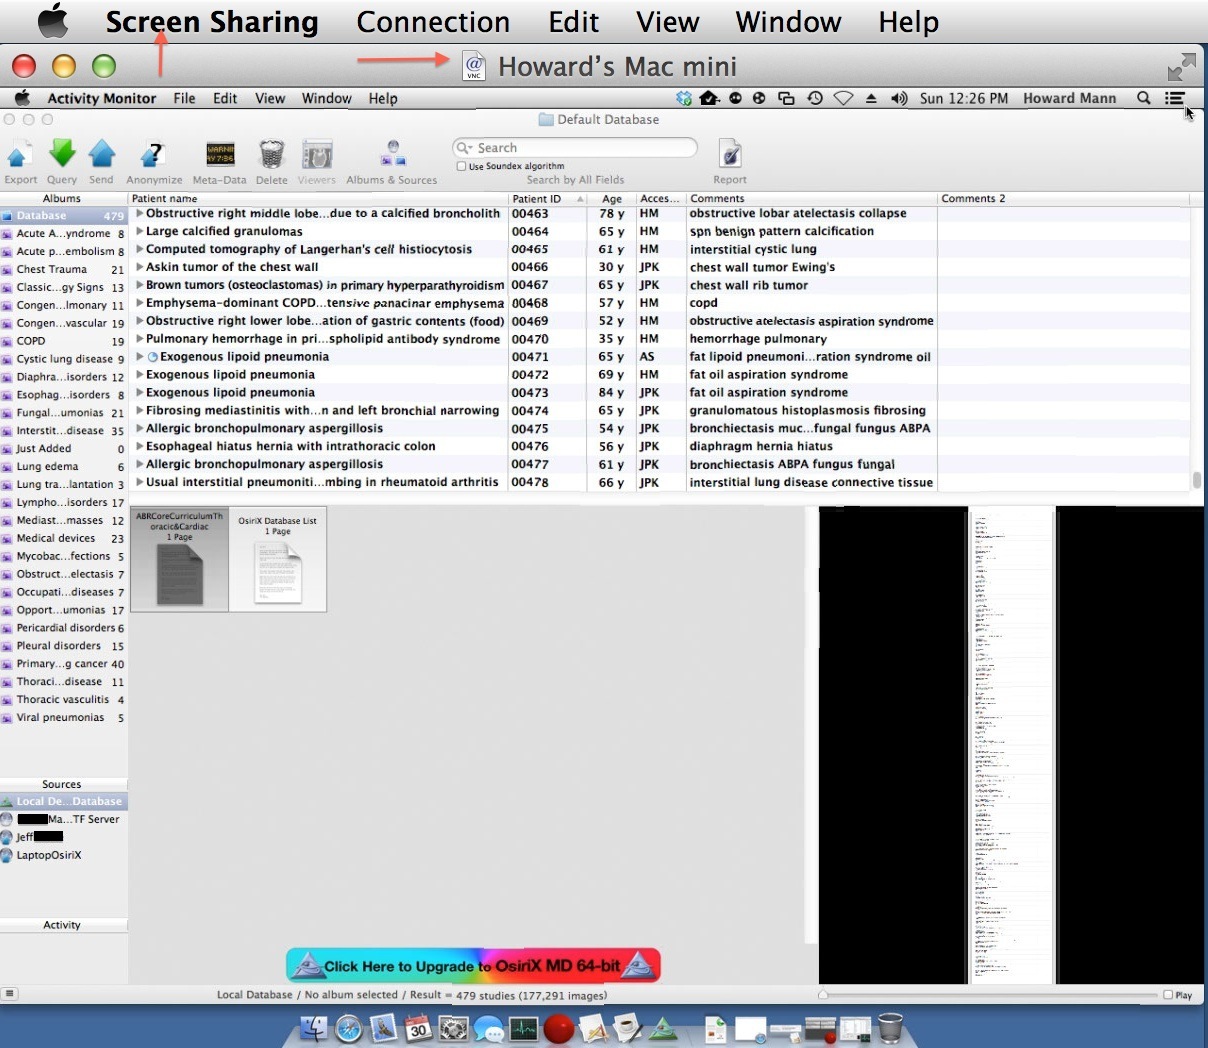
Here is an image of me working with my (non-local) Mac mini Server from home:
For an OsiriX server, you need to institute a number of actions and specify particular system-wide preferences.
General instructions and guidance are available at this Web page.
Here is a summary of the things you should do:
I want to be sure that OsiriX is always running and is restarted in the event of an elecricity failure or an unexpected application crash.
I use the application Lingon for this purpose. Here is a sceenshot of it running on my server:
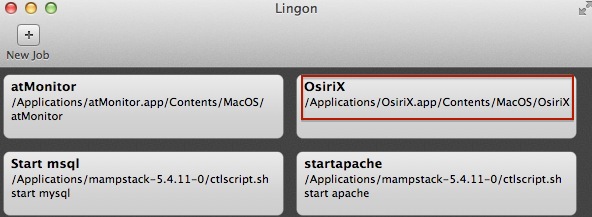
If you use Lingon for this purpose, specify that OsiriX is initiated at login/load and is “kept running.”
In System Preferences: Energy Saver, select “ Start up automatically after a power failure.” Move the slider for “Computer Sleep” to “Never” and select “Wake for network access.” Do not select “ Put hard disks to sleep when possible.”
In System Preferences: Users&Groups: Login items on your Mac, make sure that OsiriX is in the List. If you use Lingon, then it need not be.
If your Server is a Mac mini which is not connected to a display, go to System Preferences: Desktop&Screen Saver, and change the option on the Screen Saver to
Neverwhich otherwise sometimes interferes with Screen Sharing. Change your Destop Background to a simple solid color.In System Preferences, select automatic log-in (Users & Groups, Login Options, Automatic login)
Activate the “Server mode” in OsiriX. This mode will hide the GUI, and OsiriX will never present a blocking window to the user (nobody will look at the server monitor to click the “OK” button…). Go to OsiriX Preferences: Listener, Server mode.
When an application on the Mac crashes, a Crash Reporter often comes up, asking you to respond and, optionally, to send a report to Apple. For a Server, you’re not there to respond to this. To prevent this from happening, open the Terminal utility, select-and-copy the following, paste it at the command line and hit “return”:
defaults write com.apple.CrashReporter DialogType Server
Like this:

You can still see and inspect the Crash Reports in the Console app if you wish.
If you ever want to change this back to the default mode, type this at the command line:
defaults write com.apple.CrashReporter DialogType Developer
Networking Considerations
The Server needs to have a static (fixed) IP address and the fastest connection speed to the Internet as reasonably achievable. There are three basic options for accomplishing this:
- Locating your Server at home
- Locating your Server at work
- Locating your server at a Colocation Facility
Home server
One purchases a package from an Internet Service Provider that includes a Static IP address(es) and a certain bandwidth. Availability and affordability are considerations for this option.
Server at work
In this scenario, you server will be physically connected by ethernet cable to the wired hospital Local Area Network (LAN). Your IT department should be able to reserve a particular IP address for your server by means of so-called dynamically assigned static IP addresssing. Ask for this. This is very convenient as you’ll then easily be able to send cases on your laptop to it from anywhere. My Mac mini Server is in my office and I DICOM-send cases to it from anywhere in the hospital such as the Reading Room where I work each day. If your Server’s LAN IP address is fixed you’ll also be able to start the OsiriX Web Server with that address as the Public address and the Web Portal will then always be available at that address, which you can then share with departmental colleagues.
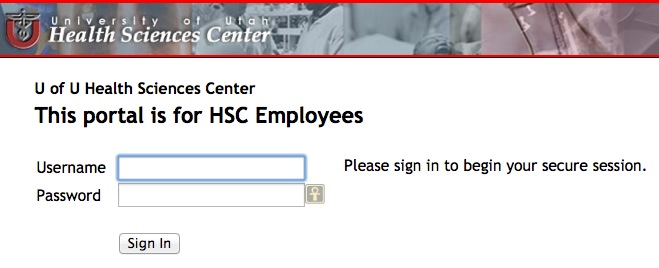
Your hospital may also provide a means to connect to the hospital network from the outside via a VPN application of some kind . If so, you’ll first connect to the network via the VPN and then have access to your Server via its fixed LAN address. The following image shows a browser-based VPN application I use to connect to my institution’s network:
Connecting to your server
In order to connect to your office Server, you can create a Virtual Private Network using an application called ZeroTier. Review the guidance document on this website about this.
In this scenario, your Server will be assigned a network-associated static IP address and other clients in the private network only will be able to connect to it.
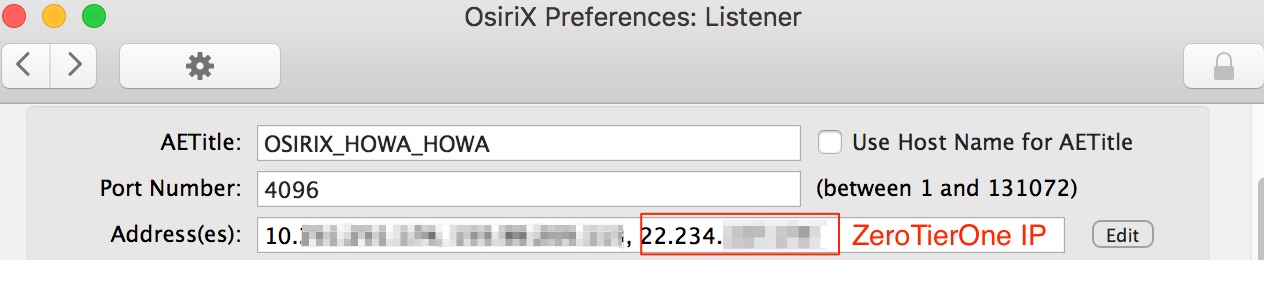
Your Server’s OsiriX instance may have multiple IP addresses simultaneously, one of which is your address on the ZeroTier One network, as shown in this portion of my Preferences:Listener panel:
The advantages of this option are:
- You will have access to your server at the hospital on a high-speed and high-bandwidth wired LAN
- You’ll have your institution’s fast bandwidth connection to the Internet to facilitate retrieval of cases from the Server from outside the hospital.
- You’ll be able to connect to your Server from anywhere (including outside the hospital) via Screen Sharing using the ZeroTier One network IP address
- You’ll be able to connect to the Server’s OsiriX Web Portal via either the Portal’s LAN IP address (while at the hospital) or via the ZeroTier One network (while outside the hospital)
- You’ll not have to purchase a static IP address package from your Internet Service Provider
Server at a Colocation Facility
At first, this idea may seem silly as your computer has to be shipped to another physical location. However, there are entities that specialize in colocating Mac minis, such as MacStadium and Mac mini Vault. They provide you with a static IP address, and offer fast Internet connections at a reasonable price. You can manage your server remotely using Screen Sharing (or a VPN application they’ll provide you) as I mentioned above.
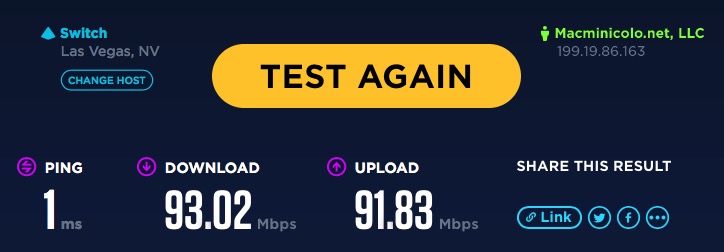
Update: May 2014
I have moved my Mac mini from the hospital to a colocation facility— MacStadium. The upload speed from there to the Internet is much faster than with the usual home setup, which is great for serving up cases. Here is a screenshot showing upload and download speeds at the facility. (You can test your own speeds at: beta.speedtest.net)
Backing up the Server
I strongly suggest that you employ two concurrent means of backing up your OsiriX Data Folder: 1) to an attached external disk utilizing software such as Time Machine and 2) to an account in the Cloud. Options for cloud storage are Crash Plan, Backblaze, and an online cloud-storage service using the application Arq. It’s easy to schedule automatic backups (once a day) with these.
Getting and anonymizing DICOM cases
If your PACS application permits you to export a case in DICOM format with one click, the most efficient method is to ask your IT department to assign your laptop (or another device other than your Server) a static IP address as well, as I described above. Then, register your OsiriX laptop as a DICOM-node on the PACS administration module. When your laptop is connected to the network via an ethernet cable, you will: 1) DICOM-send the case to your laptop OsiriX, 2) anonymize the case on your laptop, and 3) DICOM-send the anonymized case to your Server. Otherwise, you’ll have to use another method such as a USB thumb drive to transfer the case to your laptop.
Remember: A non-anonymized case should not be on your Server at any time.
Here is a screenshot of me sending a case to my laptop OsiriX directly from our Philips iSite PACS:

I always have my laptop connected by ethernet cable to the LAN at the Workstation I’m working at, so I can do this as I perform my daily work in the Reading Room. If I have time right then, I’ll anonymize it, check the meta-data again to verify that the anonymization of personal information is complete, and DICOM-send it to my Server. Otherwise, I’ll do this step another time.
Anonymizing cases – three methods
Using the OsiriX anonymizer
Here is the scheme I currently use. It removes common sources of Personal Information, including that in Private Tags that vendors often employ.
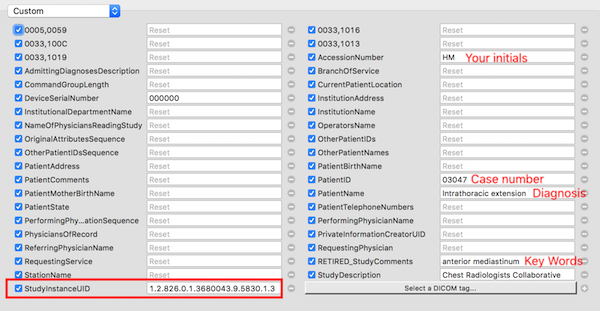
Add to these as necessary as you inspect the Metadata as I indicate below.
Important: When you use the "Merge" command in OsiriX to merge all the Studies/Series of a particular case before anonymizing it, the component Studies will be split again when you DICOM-send or Retrieve it from the Server. This is annoying! Prevent this by putting an appropriate number in the DICOM Tag "StudyInstanceUID" as indicated above in the graphic.
This number should be derived from your personal UID root (prefix) that you use for all the cases in your Teaching File(s). Review this guidance for information about getting this prefix and how to use it. It’s easy!
The Diagnosis you insert should not be longer than 64 characters to comply with the Dicom Standard.
With all the DICOM tags I’ve added to this scheme most cases are anonymized such that all personal information is removed. But not always. Scroll through the Metadata of a Series of a case to be sure that none is left. If any remains, use the next manual method to remove it. You can also use the manual method to edit any particular field(s) in the DICOM Header (Metadata).
The Manual Method
OsiriX permits one to edit any particular field in the DICOM header. This is a three-step process as indicated below:
- Activate the editing function by clicking on
edit. - Double-click on an entry to edit it and hit return. Edit other items as necessary.
- Click
Applyspecifying theStudylevel so that all the Series of the Case are changed.

Using Dicom Anonymizer to anonymize cases
If you do not use OsiriX to anonymize a case, a great application to do this is Dicom Anonymizer. Indeed, it’s easiest to anonymize a case on your desktop with this before importing it into OsiriX.
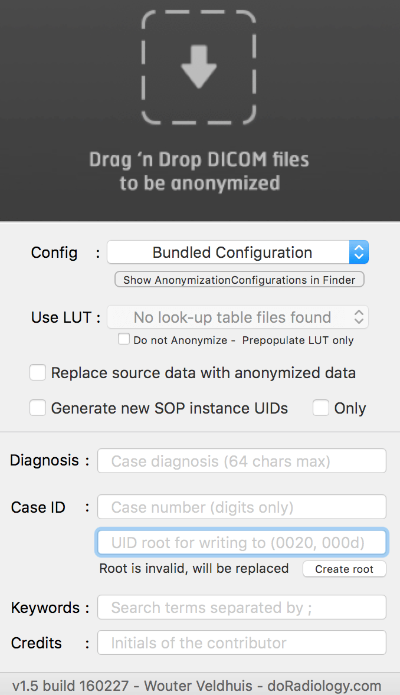
Review my guidance document on this web site for details on its use.
Removing personal patient information embedded in an image
Sometimes, for example, with an ultrasound image series, PHI is embedded in the image and cannot be removed by editing the DICOM header. In this case, the relevant portion of the image has to be removed, the resultant image saved as a separate Series, and the original Series deleted.
The process is as follows:
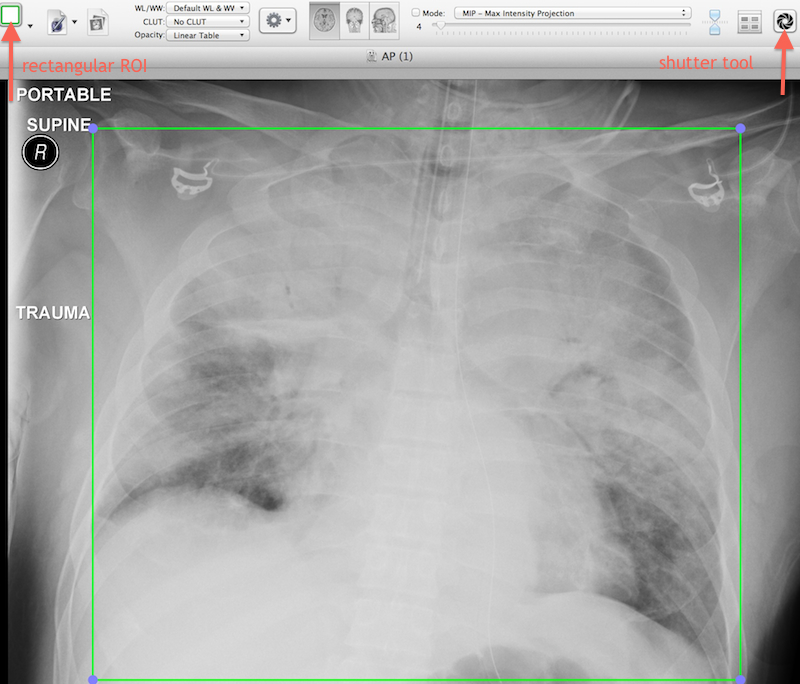
- Define the area to be retained with the
rectangular ROI tool. In the image below, I’m using this technique to exclude extraneous markers from a bedside chest radiographic image. The same process may be used for an ultrasound or nuclear medicine series containing many images. - Click on the Shutter Tool icon in the toolbar. If the icon is not there, right-click on the toolbar, choose
Customize Toolbarand drag it there. - This image demonstrates what you see just before you invoke the Shutter Tool
Next steps…
- Now that everything outside the ROI has been removed, use the Zoom and Pan tools to resize and center the resultant image as necessary in the window.
- Hit
Command-Eto save this as a new Series (named as you choose) in the case. For Image Format, specifyas displayed in 16-bit BWbefore clicking OK. - Delete the original series.
If you want to view an excellent video of this process applied to an ultrasound examination, do so right here (Credit: Dr. Mary Roddie, OsiriX U.K. User Group):
If you have a single jpg” alt=“image with embedded personal information that you want to import into an OsiriX case, use the Preview application that comes with every Mac to crop out the information (or blacken it) and then import it into the case with the OsiriX menu item: Plugins...Database...JPEG to DICOM utility, specifying the Meta-data: from the selected study in Database window option when doing so.
Configuring OsiriX on the server
You need to configure certain items in OsiriX Preferences differently for a Server compared to a Retrieving Workstation. The scenario is analogous to that in your department: Your PACS Server delivers images on demand to Workstations; the former is equivalent to your OsiriX Teaching File Server and the latter are the devices retrieving images from it. The options you should specify in your OsiriX Preferences are indicated on the following screenshots from my Server:
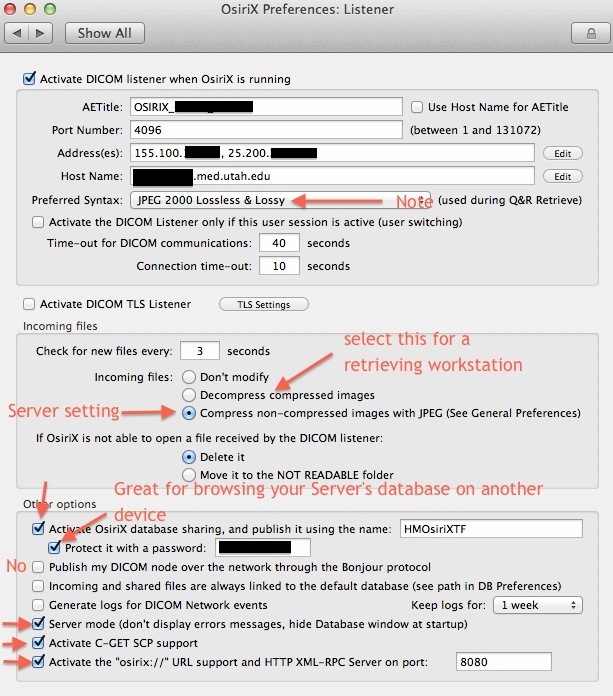
Do not choose the option to broadcast the existence of your Server via the Bonjour protocol. If you do, any person with OsiriX on the network may see your Server’s Dicom-node parameters (AE Title, IP address and Port) by hovering the cursor over it in the Sources List and try to query your Server for cases via the Query/Retrieval window, as explained further below:

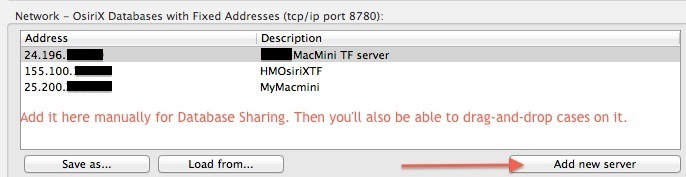
Instead of this, you could manually add it to the List of Shared Databases on your laptop’s OsiriX as shown here:
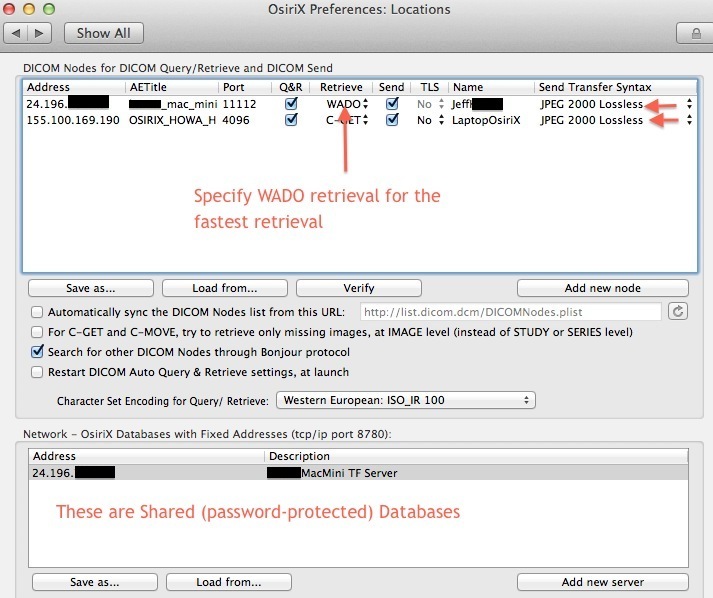
When you specify “WADO” above, you’ll need to specify additional items as indicated here:
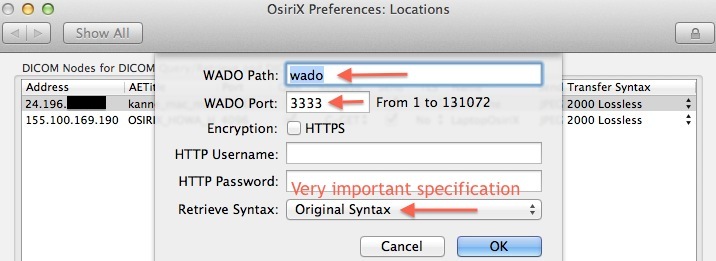
It's very important to specify retrieval using the **Original Syntax** which is JPEG 2000. If you do not, the server will decompress the images before sending them diminishing the transfer efficiency. In addition, the decompressed images will then remain on the server in a decompressed state, slowing the retrieval speed for subsequent retrieval requests.
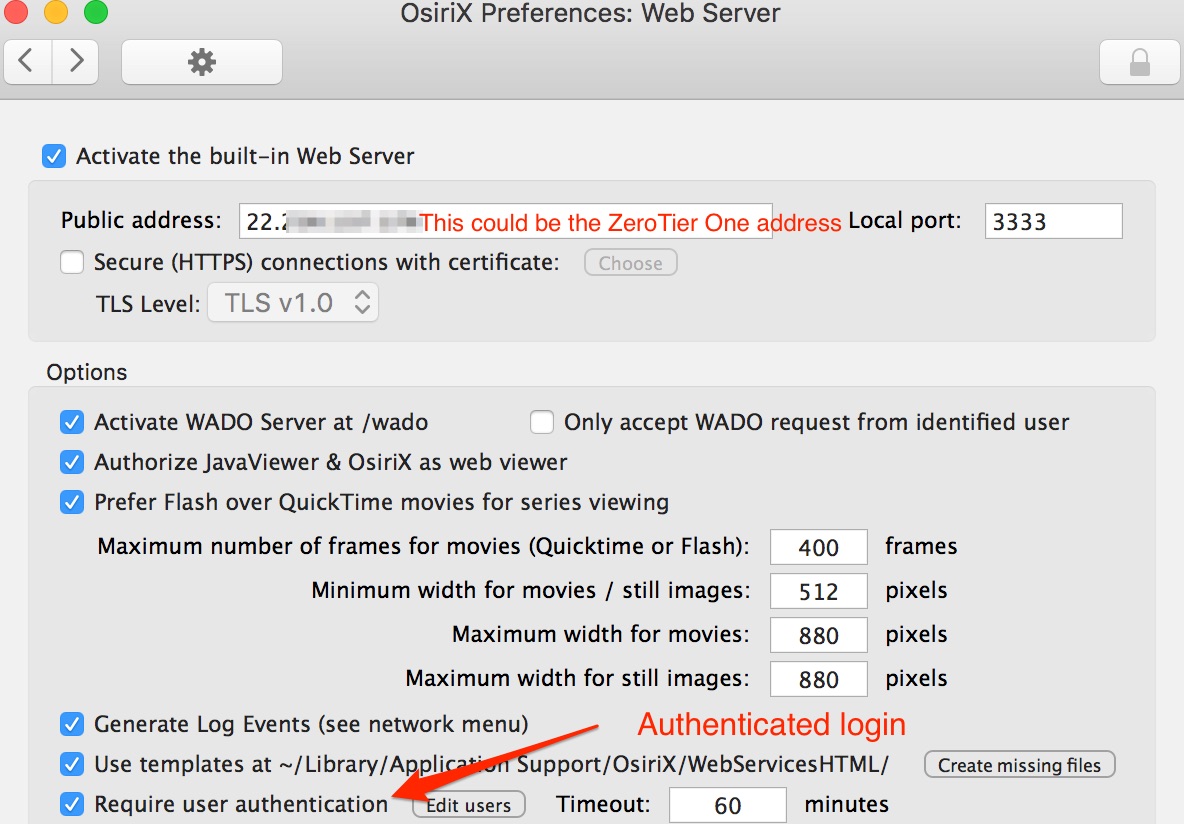
Osirix Web server
Understanding a JPEG 2000 Teaching Server Network
As I alluded above, transmission of data over the network is facilitated by the use of data compression with the JPEG 2000 algorithm. This should not be conflated with the production of jpg” alt=“format images. It is a compression scheme that permits lossless and lossy compression. The degree of compression may be stipulated in OsiriX Preferences:General.
The default values may be changed to achieve greater compression, without a perceptual difference in quality. I highly recommend you do this as it will allow you to store more images on your storage medium and your cases will be retrieved faster over the network. Review the guidance document on this web site for details. It’s easy!
Here is the default compression scheme I suggest you use:
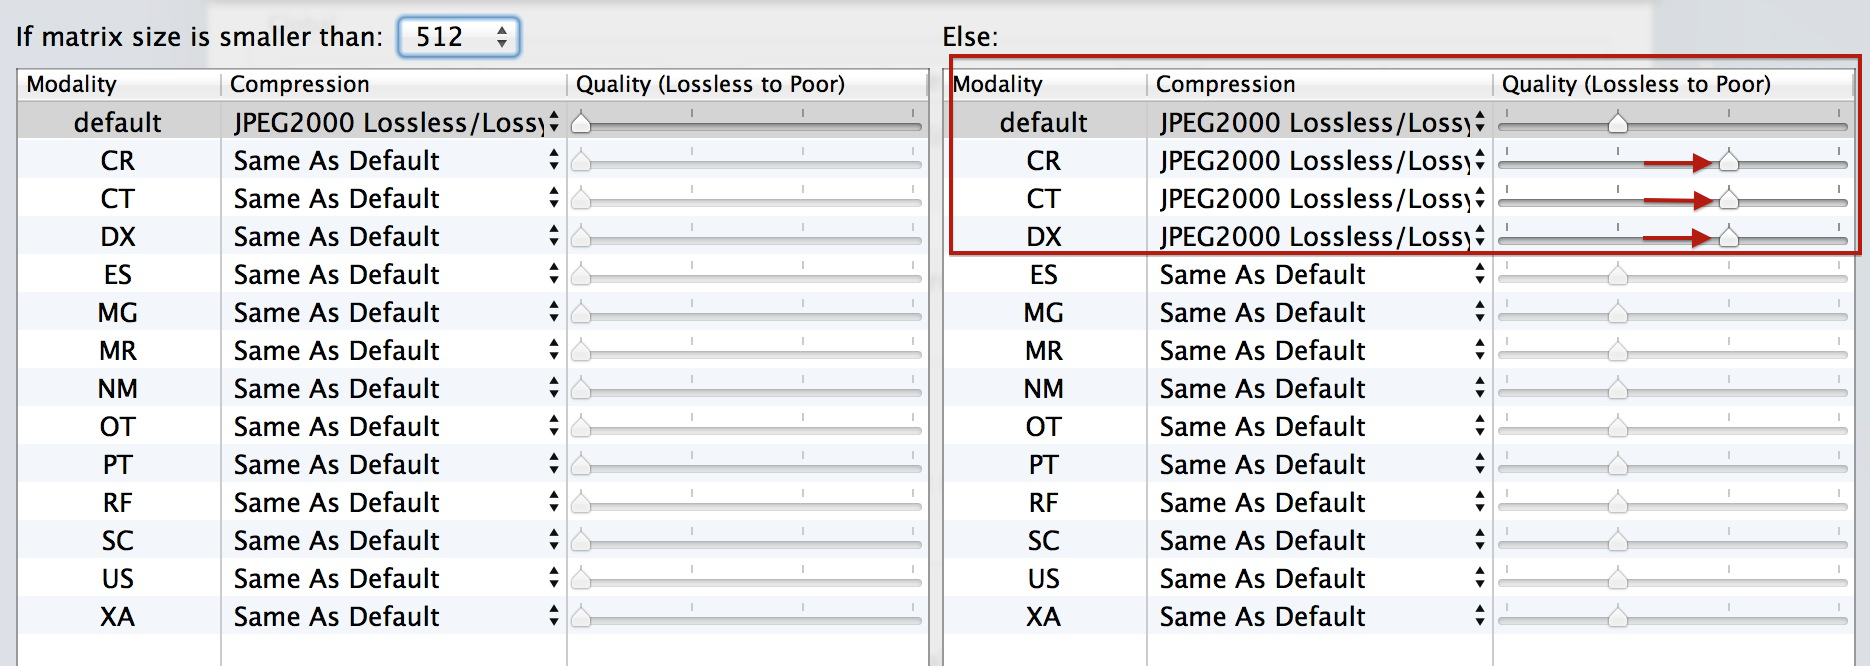
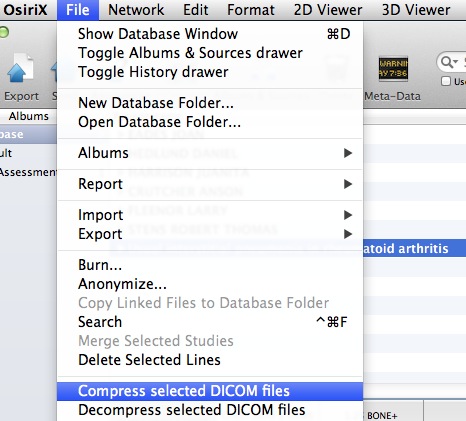
Just get in the habit of right-clicking on a case after you’ve anonymized it and choosing “Compress DICOM files.”
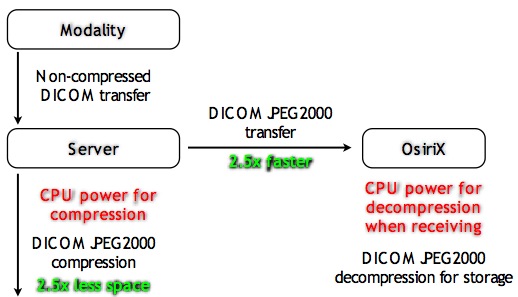
For best performance and transmission efficiency, the network should be configured such that all aspects involve the JPEG 2000 transfer syntax. The intended result is that decompression of the images for viewing will occur once only: after the data have been received by the requesting Workstation. When using the WADO (Web Access for Dicom Objects) protocol for retrieving cases from a server, one should specify, as indicated in the graphics above, transmission via the Original Syntax (Send Transfer Syntax) which, in turn, should be specified (in Preferences: Locations) as JPEG 2000.
For further details about this, read the relevant part of this PDF document
Here is a graphic summary of the requisite setup:
If you’re unsure whether a particular case on your server is compressed, compress it manually as shown here:
Querying a Server for Teaching Cases
There are two basic ways of querying a Server for cases and retrieving them:
- Using the OsiriX Web Portal
- Using the OsiriX Query/Retrieval window
The Web Portal
After you login to the Web Portal and find a case you want to retrieve, there are three choices as shown in this graphic:
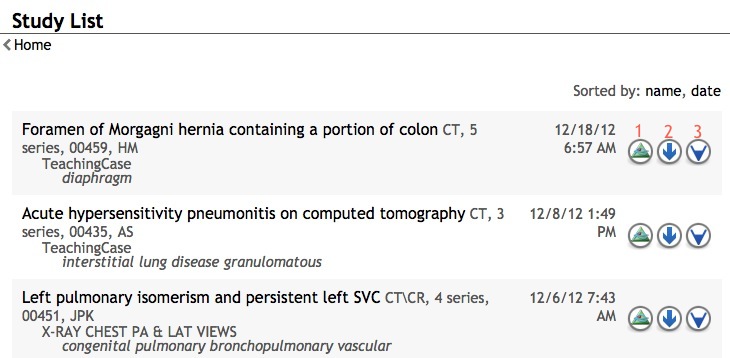
- WADO retrieval directly to your OsiriX database
- Download case as a Zip file
- Download the case and view it with the Weasis viewer.
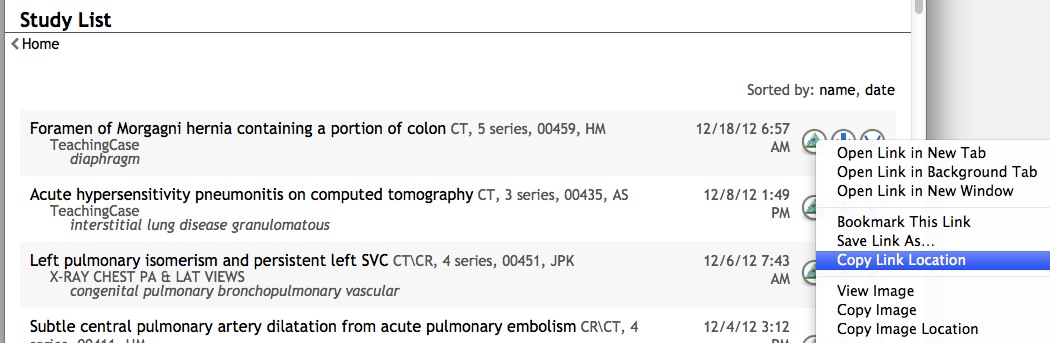
WADO retrieval is a great option. Indeed, you could right-click on the OsiriX icon and choose Copy Link Location and send the link to any one with access to your server to allow him to use the link to download that case:
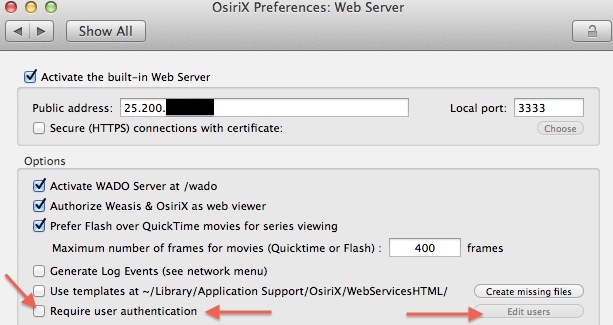
Allowing others to retrieve cases via the Web Portal is a good option because you can control which people have access (username and password) to it and control whether they can upload cases to it or share cases with others. All these options may be specified when you select this method of control:
If you select to view the case with Weasis, the java-based Weasis Viewer will automatically be downloaded to your computer, started, and the case retrieved into it (You have to permit java applications to be downloaded and run on your computer.) . It’s also a great way for someone without OsiriX to view the case.
Using the OsiriX Query/Retrieval window
This is a great way to query multiple OsiriX Servers simultaneously as shown here where I’m querying my and a colleague’s servers for an “aortic…” case:
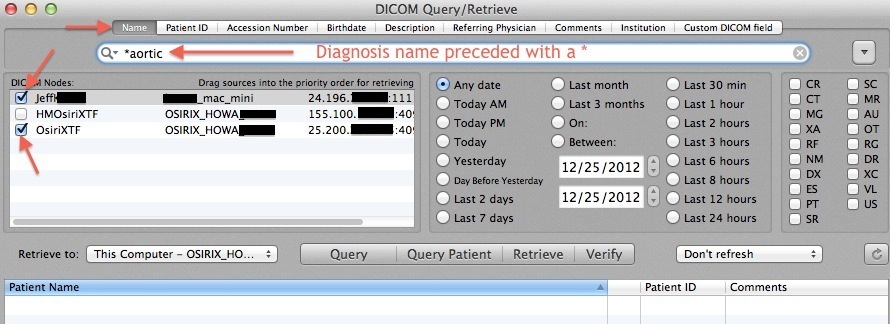
Reminder: Before retrieving a case using this method, check again to be sure you have specified the WADO protocol and Original Syntax in your OsiriX Preferences: Locations for the server you're about to retrieve from.
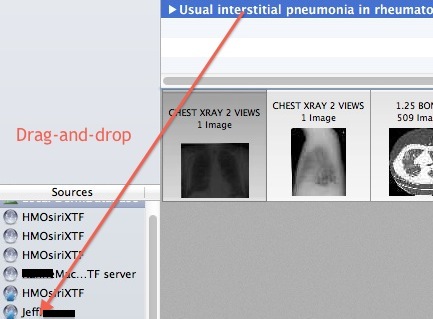
DICOM-sending a case to a colleague’s server
You can DICOM-send a case to another member’s server when saving it to our own. This is easy to do. Just select the case in your Database Window and drag-and-drop it over the icon for it in the Sources List as shown here:
Exporting a case to share with colleagues
In addition to the methods for directly sharing cases via the network I described above, you can export a particular anonymized case to share with colleagues, for example, via Dropbox or a similar cloud-based service:
- Create and label a new folder on your desktop.
- Right-click on a case (or select several cases) and choose
Export to DICOM File(s) - Navigate to and select the folder you created on your Desktop and specify the options shown here:
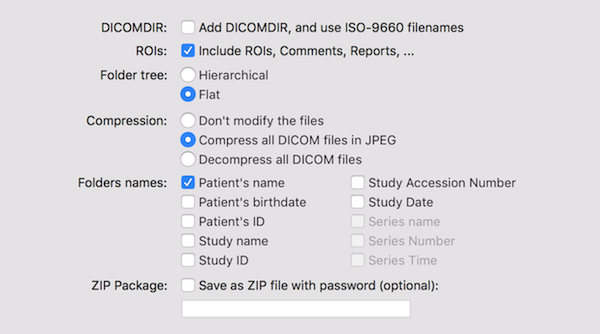
Important: Note the checkbox for Compressing files with JPEG above. Select it. If you've forgotten to compress your cases (as I mentioned above), this will achieve compression at this point.
Now drop the folder into your Dropbox and email them a link to download it once it has been uploaded to the Dropbox server.