Nov 14, 2014
A Customized Teaching File Anonymization Scheme For OsiriX
Sharing or publishing an OsiriX Teaching File case requires antecedent anonymization of the meta-data associated with it. After importing a case into OsiriX’s Local Database, one can use OsiriX’s anonymization utility to accomplish this. When you first install OsiriX, the “default” anonymization scheme is insufficient for complete removal of all the personal information (about the patient, but also the ordering physician, among others) in the so-called Dicom “Header.”
In this guide, I’ll describe a method you can employ to quickly configure a comprehensive scheme to get you going. It’ll remove the great majority— but not always all —of the personal information items present in the meta-data. If you need to manually remove residual items, look at the relevant part of this guide for a description of how to do this.
OsiriX Anonymization Window
The customized anonymization window should look like this:
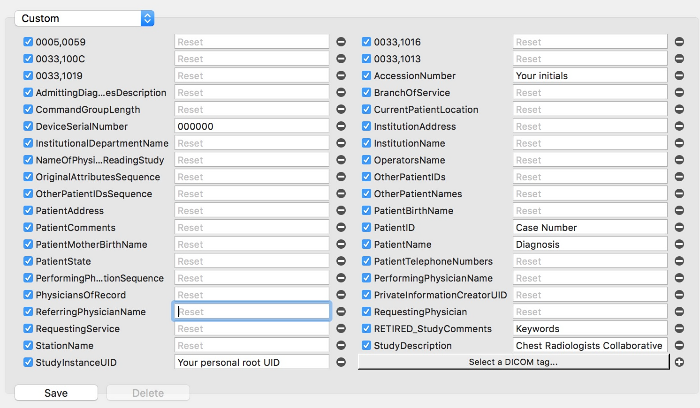
The number for StudyInstanceUID should be derived from your personal UID root (prefix) that you use for all the cases in your Teaching File(s). Review this guidance for information about getting this prefix and how to use it. It’s easy!
The Diagnosis you insert should not be longer than 64 characters to comply with the Dicom Standard.
While one can manually edit the default scheme to achieve this, it’s a bit cumbersome to find each Dicom field (by using the “Select a DICOM tag..”) to add, one-by-one.
The Osirix .plist Preferences File
This file contains the anonymization scheme as well as all the other preferences you’ve configured for your OsiriX instance. We’re going to edit this file directly to add the WebConfCustom scheme. To do this, go first to OsiriX: Preferences: General.
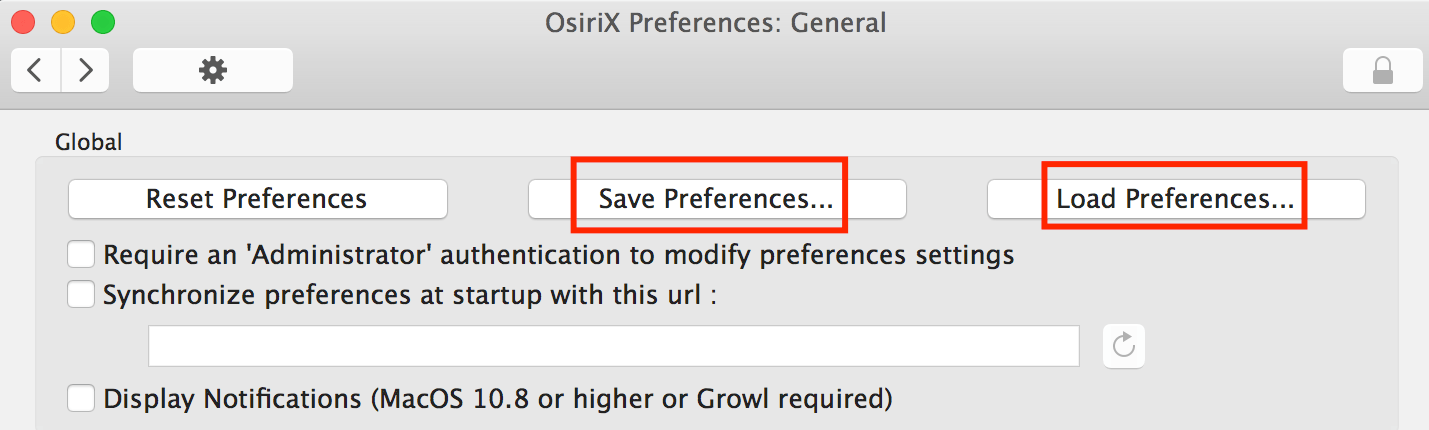
Start by clicking Save Preferences... and save one copy to your Desktop and one somewhere else in case you make a mistake. You’re going to edit the copy on your Desktop.
Open the file with TextEdit and scroll down until you see the section starting with this line:
<key>anonymizeTemplate</key>
Each anonymization scheme has the following format: <key>Name</key> followed by the content between an opening <dict> and a closing </dict> You’re simply going to add another one to those already there. Once you understand this format, download this file, open it, copy-and-paste the scheme in the proper place in your file, and save it.
That’s it!
Now go back to OsiriX: Preferences: General and click the Load Preferences... button and choose your edited file. The new scheme, called NewAnonymizationScheme, will now be there and selectable for you to use.
If you make a mistake, you can always load the copy you saved, and contact me if you can’t figure out what happened.
Cheers!